Beauty Tools, Cleansers, Eyeliner, Eyeshadow, Face, Mascara, theBalm

the Balm Balms Away Eye Makeup Breakup Remover Review

balms away

Amazon, $12.99

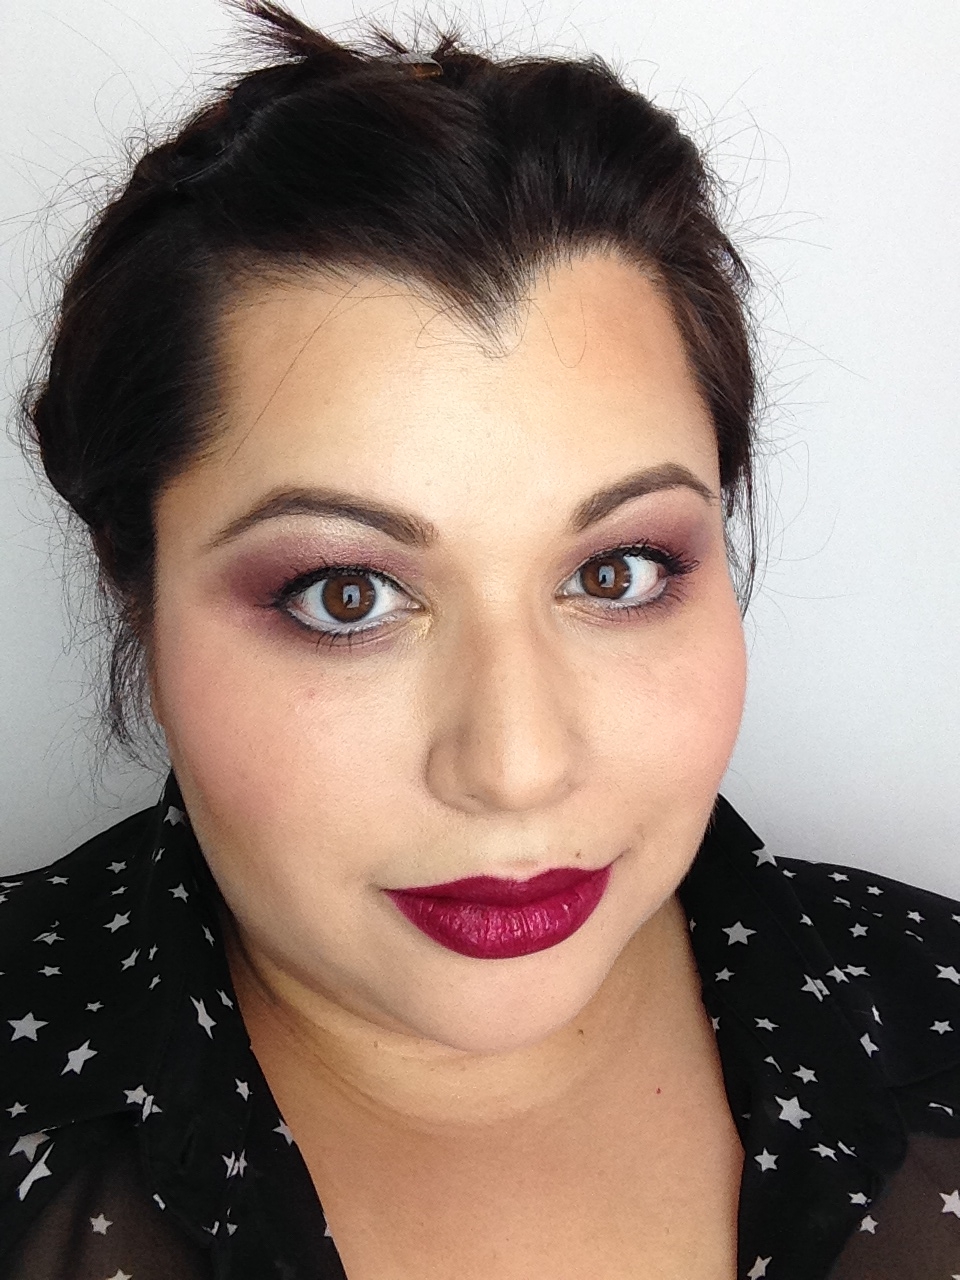
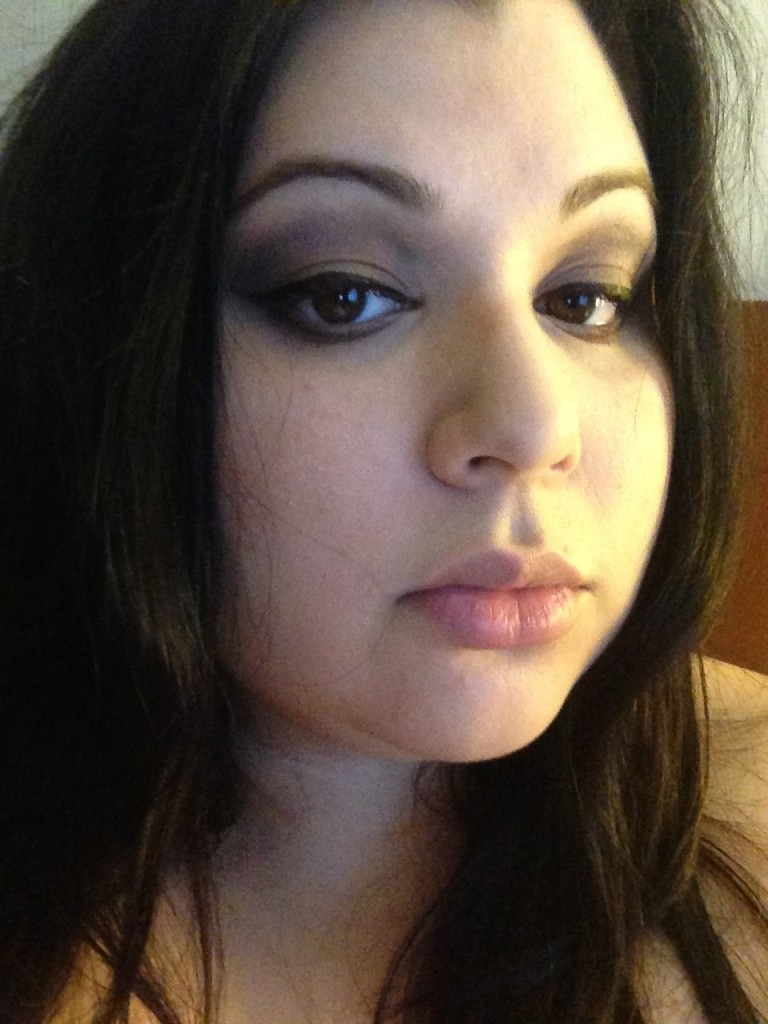
So, we’ve established that I love to wear a lot of eye makeup and too much mascara. We know this. So, I guess if we really think about it, we also know that I might probably go to bed a lot of nights with raccoon eyes. It’s not for lack of trying on my part. I really do try to get it off! Every eye makeup remover I’ve tried stings my eyes and/or turns my vision cloudy even until the next morning, so I resort to all kinds of other possibilities. I’ve used assorted and varied oils, I’ve tried all kinds of cleansers, I’ve rubbed and rubbed. It’s all hit or miss.

This is a problem because leftover eye makeup can cause those tiny, hard, underground bumps around my eyes. They’re not pimples because they’re not caused by bacteria. They’re called Milia, and they’re actually little cysts comprised of dead skin cells, oil and dirt. Dirt includes leftover eye makeup. I get these little bumps, and then, even though you’re not supposed to, I scratch at them. I can see them under my makeup, and they really rile up my picking tendencies. Your girl wants to party all the time, and a party for me is a really sharp pair of tweezers, an extracting loop, and a clogged pore. BUT THAT’S BAD. I know better. I went to eight months of beauty school, so, yeah, I know what I’m talking about. Call me Pimple Popper, M.D..

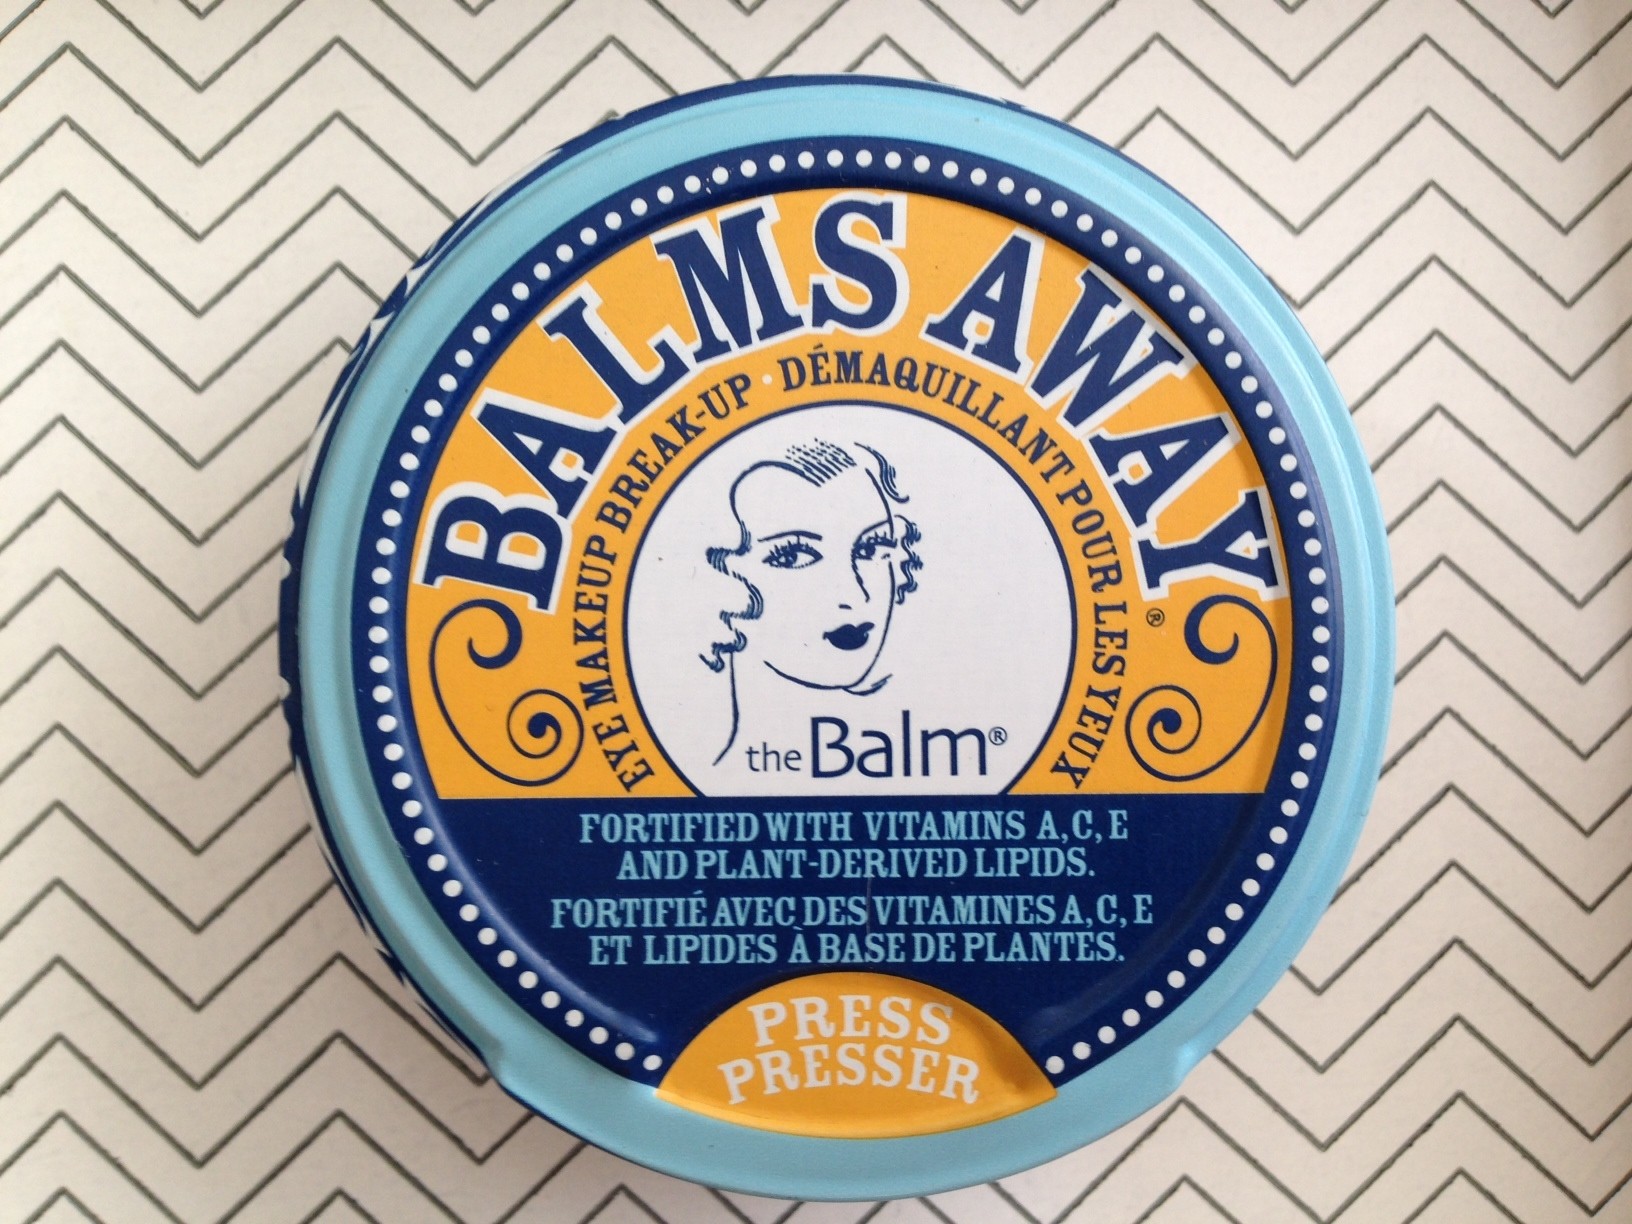
I don’t even really try with real eye makeup remover anymore. I tried this one kind of because it looked moisturizing, but mostly because it was half price on HauteLook and I had a credit.

I am so, so happy I took a chance! I love this stuff so much!

balms away detail

As you can see, I’ve been sticking my fingers all in this. It looks gross, but I think it’s good because it gives you a better idea of the product texture. It has a consistency that can best be described as “Crisco-like.” You glob some onto your closed eye, work it in a circular motion for 30 seconds (take some time to focus on your lashes), then, you wipe it off with toilet paper. If you have a bidet, use a kleenex. I was using a cotton round, but for whatever reason, the TP works better. All the makeup should wipe right off, even the mascara and liner under your eyes, and your eyelids will be moisturized! I always do this before I wash my face with my cleanser, so I wash off any excess oiliness then. It’s a dream come true!

I’m removing pigments, I’m removing mascara that doesn’t play, I’m removing black gel liner that promises 24 hour wear. I’M UNSTOPPABLE. This stuff makes me so happy because a lot of times I’ll skip a serious eye look just because I don’t want to deal with a difficult removal process that doesn’t even clean everything off. Now the only thing standing in my way is my own laziness. As usual! That’s ok, I can deal with that.

Buy theBalm’s Balms Away Eye Makeup Breakup Remover HERE.

Standard
Eyeliner, Eyeshadow, Face, Fave Looks, How-To, Lips, MAC, Naked, OCC, Sephora Collection, Urban Decay

OCC Black Dahlia Look Breakdown

occ lip tar set black dahlia

Witch-ay Woman

A commenter asked about the other makeup I’m wearing in this photo from my review of the OCC Lip Tar All-Star Mini set. I was like, duh, I should probably start including that information along with my photos. I guess I probably never thought about it because I am the worst and I like to keep all my secrets to myself. Like, if you gush about my sunglasses and ask where I got them, I’ll tell you–but, inside, I really don’t want to. I know. That’s terrible. And it’s not even the grossest thing about me. Don’t worry, I get karma back on it. A couple months ago, I asked a lady at the farmers market where she got her sunglasses, and she was all, “I don’t remember.” And I was like, “Girl. Yeah, right.” It’s like Justin Timberlake says, “What goes around, goes around, goes around, comes all the way back around.”

So, the makeup in this picture!

Eyes – It looks like I used three shadows for this look. From the original Urban Decay Naked palette, I used “Virgin” for the brow bone and “Half Baked” for the inner eye corners. The bulk of the shadow, the wine color, is from a very old TIGI Cosmetics palette. I tried to find it, and unfortunately, it doesn’t look like they make it anymore. I swear this is not me just trying not to tell. I bough the palette when I was in beauty school a million years ago, and I probably shouldn’t even be using it anymore. The color was just called, “Wine,” and it’s not very hard to dupe; any wine color that leans more towards a plum will do the trick. I used a white pencil liner from the Sephora collection on my lower waterline, and UD’s black pencil liner on my bottom lash line and upper waterline. The mascara is Benefit’s They’re Real.

Eyebrows – Anastasia Beverly Hills Brow Powder Duo in “Brunette/Dark Brown” is my go to brow product. I use a light mixture of the two colors on a thin angled brush.

Blush – “Peaches” Sheertone Blush by MAC.

Lips – OCC Lip Tar in “Black Dahlia”

There you have it! I guess I really don’t mind telling about makeup and beauty stuff. I mean, if I did, I probably wouldn’t have started a beauty blog. So, the good news is, my shadiness only extends to accessories! The bad news is, I will never ever start a sunglasses and bracelets blog.

Standard
Beauty Tools, Beginner, Eyeliner, How-To

Cat Eye Tips

stila

Look. I’m a little bit of a bullshitter when I need to be. I think I might be the World’s Smartest Lady, so I’m usually pretty confident in my ability to figure things out. I’ll fake it until I make it. Unless I think I can’t make it, then I’m all, “This is stupid!” and I quit. Who needs to keep at something stupid? Also, I can dish it out, but I can’t take it. That piece of info is neither here nor there, but, I thought since I was freely discussing the worst parts of my personality, it was worth mentioning.

What I am not faking is my ability to do a killer cat eye. I wasn’t always good though. I’ve spent lots and lots of time making a huge mess of my eyelids. But, at this point, I’ve been working at it for 15 years, so it doesn’t intimidate me anymore. I can bang out an even, perfect line in just a couple minutes. It’s extremely satisfying, and I want that feeling for you too.

I thought I’d share a couple tricks I use that might help you achieve a cat eye!

1. Draw the tail first! That’s the hardest part, but it’s easier if you do it first, and then connect it to the rest of the line. You can always build if you need to, but you’ll have a good line to follow. Pick a static, easy to find spot you can match to the other side, and start the end of your tail there. Like, line up the end of your tail under the end of your eyebrow, then do the same thing on the other side.

2. Do your bad eye before you do your good eye. You guys know what I mean, right? Your dominant hand will be the same side as your good eye. I’m sure you’ve already figured that out though. It’s way easier to match a good eye to a bad eye than it is to do it the other way around. I can’t tell you how many times I’ve drawn a beautiful cat eye on the right side, only to draw a completely different cat eye on the left side. It’s so annoying. That’s how you start down the slippery slope of, “I’m just going to even this up a little!” You know where that gets you. Nowhere good.

3. Start with a thin line. You can make it thicker little by little. This is self explanatory.

4. If you really struggle with liquid liner, consider switching to a gel liner with an angled brush. Years and years ago, when I would still take half an hour to do my liner, Benefit came out with a thin, angled eyeliner brush that totally revolutionized the cat eye for me. I used it for a long time, and it made my eyeliner so much easier, it was ridiculous. After I went back to liquid liner, I didn’t really have the same struggles. Those brushes are like liquid liner training wheels.

sonia liner brush

This one is available at Target for $5.99. I have it, and it’s solid. The angle makes it much easier to see what you’re doing, and it feels more natural in your hand. Get a little pot of liner, and you’re good to go!

5. PRACTICE! Like I’ve said here before, you might be bad at something the first few times you try it, but you probably won’t be bad on your twentieth time. If you have the time and attention span, do your cat eye, wipe it off, and do it again. Or, do it on days you don’t have anywhere to be. The experience adds up, especially if you’re working at it regularly.

These are the best tips I can think of right now. Keep at it and you’ll grab that cat by the tail, I promise

I hope these tricks help!

Standard
Eyeliner, Eyeshadow, Fave Looks, How-To, Links

Too much eyeliner for the house!

rachel bilson the to do list tbd

I have a sort of complicated relationship with The Beauty Department. Some of their stuff makes me roll my eyes, some of their stuff makes me scramble for my brushes and a reason to do fancy makeup. Like this “RED CARPET BREAKDOWN” of Rachel Bilson’s look at the premiere of “The To-Do List” has got me wishing we weren’t broke right now, so I could get dressed up and go out.

Check it out HERE.

Standard
Benefit, Eyeliner, Eyeshadow, Fave Looks, How-To, Stila, Urban Decay

SF Smoky Eye

This was the eye look I did on Saturday night before we went out to a party.

SF smoky eye

With the exception of my Stila liquid liner, my mascara, and my white highlight liner, I used all Urban Decay products.

First, I applied UD’s Primer Potion in Eden to my entire lid up to my eyebrows. Second, I used “KINKY” (matte nude) from UD’s Smoked Eyeshadow Palette over my lid to the crease. Third, I used an angled brush to apply “GUNMETAL” (dark grey) from UD’s original Naked Palette to the area a little above my crease and down to the outer corners, connecting in a “V” to my upper lash line. If you want to make your eyes look bigger, creating a false crease a little higher than your actual crease is a way to do it. Third, I used a fluffy brush to wash “TEASE” (taupe) from UD’s Naked 2 Palette over my entire lid, up to the dark grey crease, blending the edges as you go. Then, I picked up a little more of my matte nude color on my fluffy brush, and blended the outer edges of the grey crease. Last, I used “BOOTYCALL” (frosty white-beige) from the Naked 2 Palette to accentuate my brow bone, always blending.

I lined my upper lash line and water line with “WHISKEY’ (dark brown) from UD’s 24/7 Double-Ended Glide-On Pencil, then I lined below my bottom lashes to about 3/4 across, leaving the area near my tear ducts, unlined. I went over the top line and created a winged line with my black Stila liner. Then, I used a white liner to line my bottom water line to also give the appearance of bigger eyes. I finished it off with my They’re Real mascara from Benefit on my top lashes only.

Since this look uses dark colors, I did my eyes before I did my foundation. That way, you can clean up any fallout you have and sharpen up any edges you’d like to define with your foundation brush. I’m not wearing it in this picture, but I did a nude lip.

Add a bun and giant earrings, and you’ve got yourself a look!

Sorry the photo quality isn’t great. I wasn’t taking pictures to put up here, I was taking pictures to check the blending and symmetry. Remember in “Clueless” when Cher takes Polaroids of all her outfits because she doesn’t trust mirrors? It’s like that. Plus, I was showing off and sending pics to my sister. Shame on me! PSYCH! I’m not ashamed.

Standard
Eyeliner, Friday I'm in Love, Stila

Stila Stay All Day Waterproof Liquid Eyeliner

fridayiminlove1

Please don’t mail me and tell me that’s not Robert Smith. I know it’s not. I’ve been crying to “Disintegration” for 20 years now, for fuck’s sake.

I wanted to start sharing some of my long time favorite products with you guys. There are so many options out there, and great buys aren’t limited to what’s new right now. I’ve been painting my face for a long time, and I have some tried and true faves that I love to recommend.*****

I love a 60’s cat eye so much, if I could only choose one eye look to do for the rest of my life, it would be that.

I love a 60’s cat eye so much, I based my wedding day makeup on Priscilla Presley.

priscilla

Ohhhh, ‘Scilla, baby!

stila

Wedding day liner, lower right corner

Liquid liner didn’t come easy for me. I started messing with it when I was about 16, and it was pretty much a disaster every time I tried to put it on. I would literally cry tears of frustration and just, like, despair, when I’d slowly and carefully line my entire eye, just to totally mangle the wing; or, I’d do one perfect eye, and then the other eye would refuse to match up, no matter how many times I’d try to wipe it off and fix it. Or, worst of all, I’d get two reasonably presentable eyes, but I’d open them before the liner was completely dry, and my entire eye would be ruined.

I persisted though. And through my hours of careful training, my hand grew steadier and my lines grew smoother. Now, I can draw on a gracefully swooped wing in seconds. That’s not to say everything always goes great, it doesn’t. In fact, just the other day I had to redraw one wing several times before it would match. Sometimes, your face just won’t cooperate, you know?

stilaliner

Amazon, $17

I’ve been through several different brands and types of liquid liner, and this one from Stila is my hands down, favorite. Last time I was in the market for a new liner, I looked at several other marker-like liners, and none of them had a tip so fine as this one. That super fine, pointy tip is what puts this liner over the top for me. It makes it so easy to fill in tiny spots between lashes, and to draw a precise point on my wings. If I want to make the line thicker, I just take a more parallel angle with the pen, and it’s perfect. It dries fast, so I don’t open my eyes and ruin everything, but not so fast that I can’t quickly fix a mistake. The pen is easy to control, and it’s comfortable to hold. The liner itself is good and dark, and it doesn’t skip or tug.

A lot of liquid liners will dry kind of shiny, and this one is no exception. If it’s particularly noticeable, I’ll dip a fine brush in some matte black shadow and go over the line.

I wore this liner on my wedding day, so you know it’s good. I was not playing games that day.

It’s usually $20, but as of right now, Amazon has it for $17.

Buy it HERE.

Standard