Coastal Scents, Eyeshadow, Fave Looks, How-To, MAC, Maybelline, Urban Decay

Double Trouble – Maybelline Color Tattoo Shadows in Barely Branded and Tough as Taupe

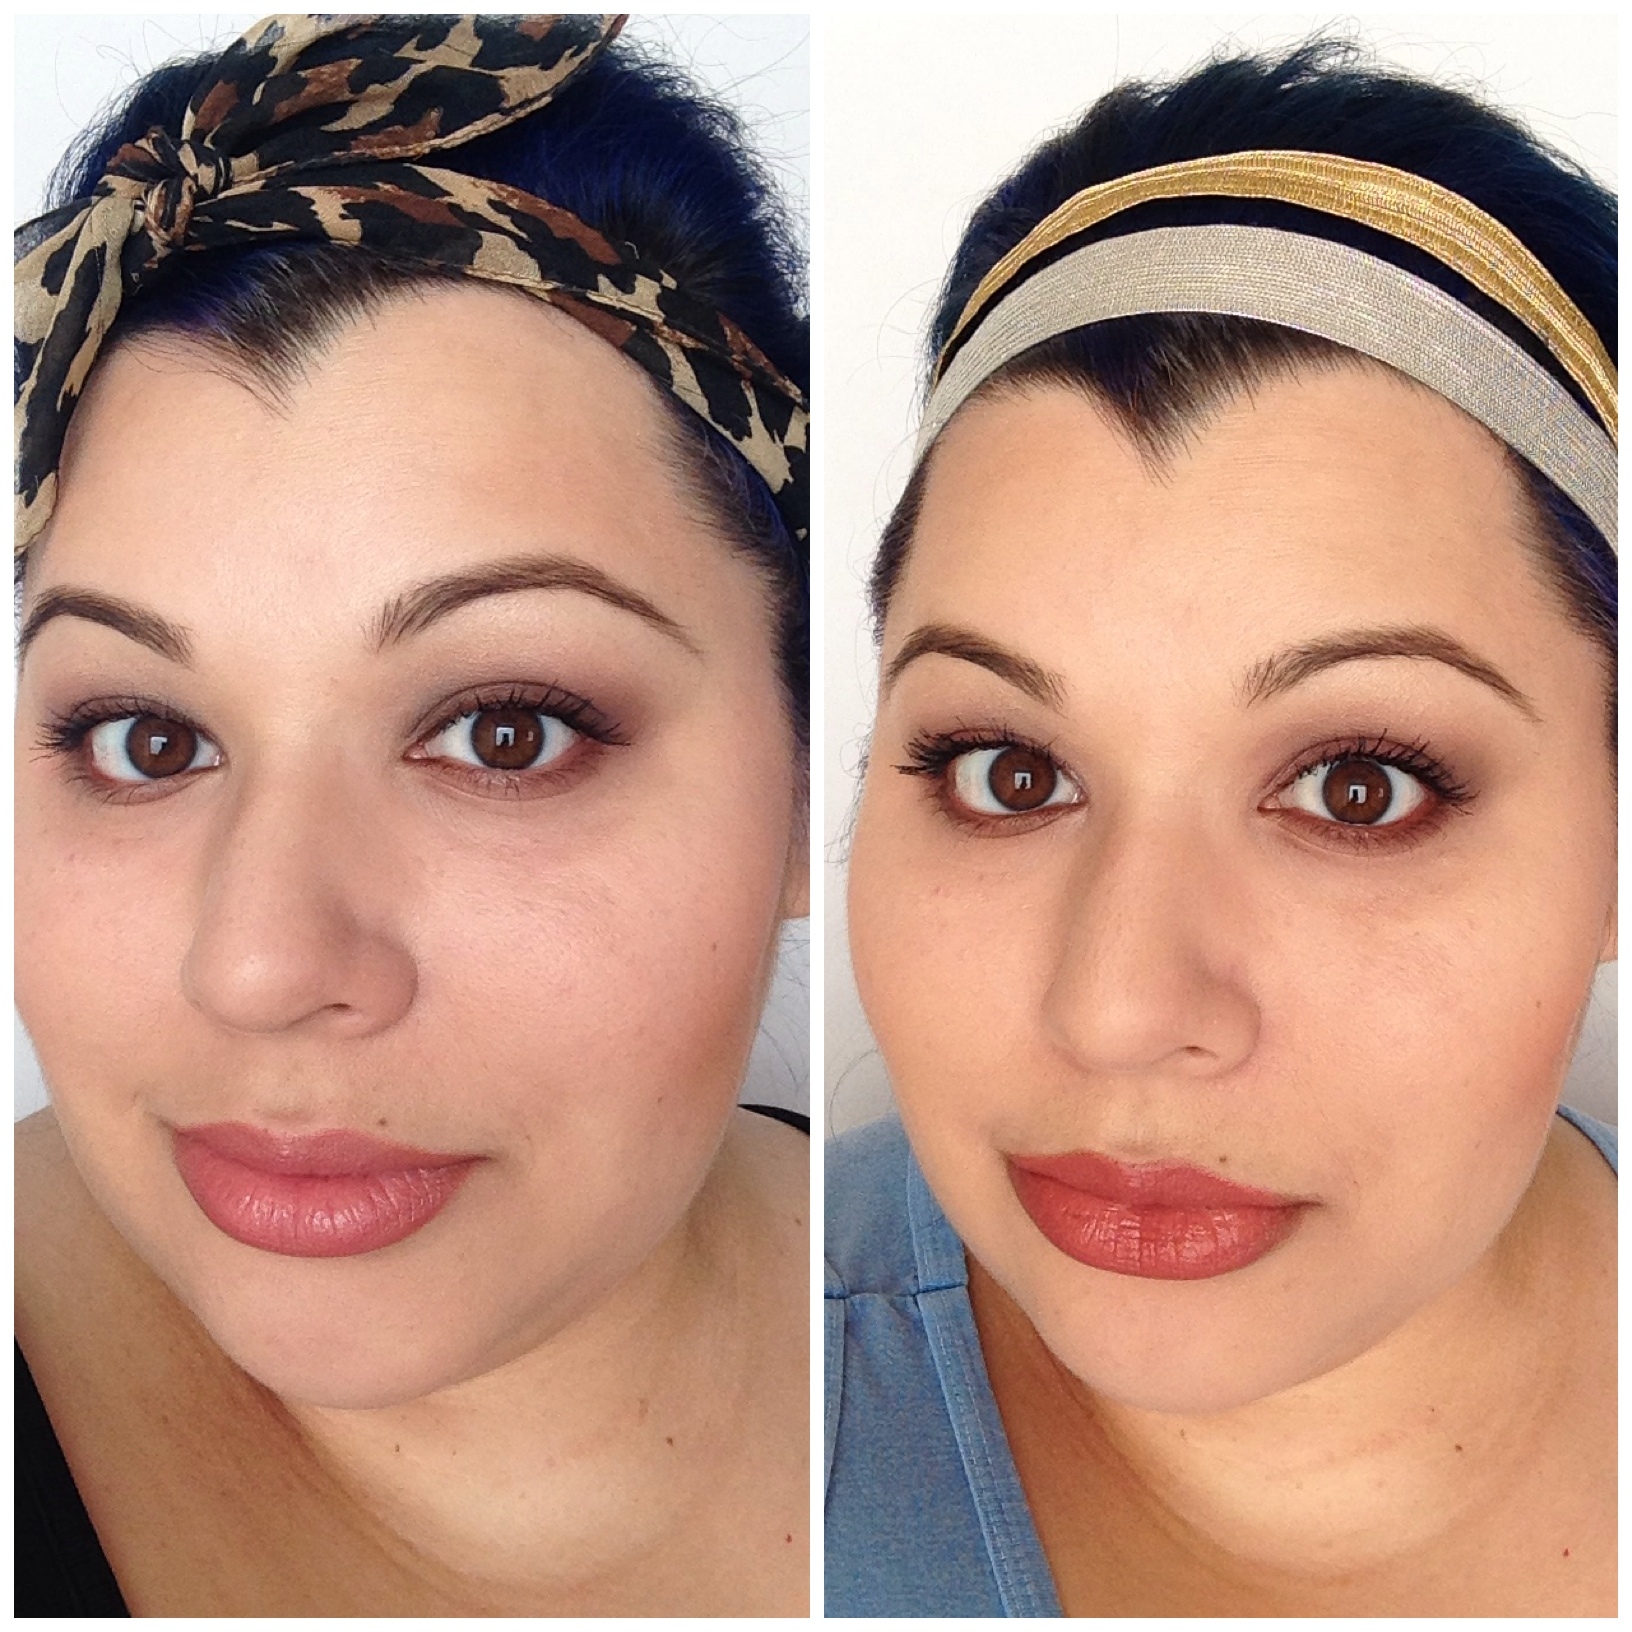
 color tattoo looks diptic

I’ve been working on this post for days! I’ve just been really distracted with, like, the Olympics, and learning to play ping pong, and I’ve had on pants and a bra SO MUCH this week, which is really, very unusual. Being seen in public a lot = less time sitting in front of my laptop. Also, I think I was telling myself this post might suck and second guessing myself tons, so I was making everything more difficult. That’s just maybe laziness disguised as self esteem problems, though. I don’t know! I guess you guys will be the judge. If it sucks, I was right, and if it doesn’t suck, I’m maybe lazy, or I maybe have self esteem problems, or, maybe both. Let’s find out!

Last week, I finally got around to grabbing a few of those Maybelline Color Tattoo cream shadows, and now I am OBSESSED. I hate that I’ve been not buying them all this time! They’re so easy to work with, and the color is long lasting. I’ve used them almost every day since I got them, and I have fully planned to buy several more.

Today, I want to show you two looks I’ve done, using the same colors. Since the colors and placement are the same, the looks are similar, but they’re both so pretty and wearable, I had to show you guys both.
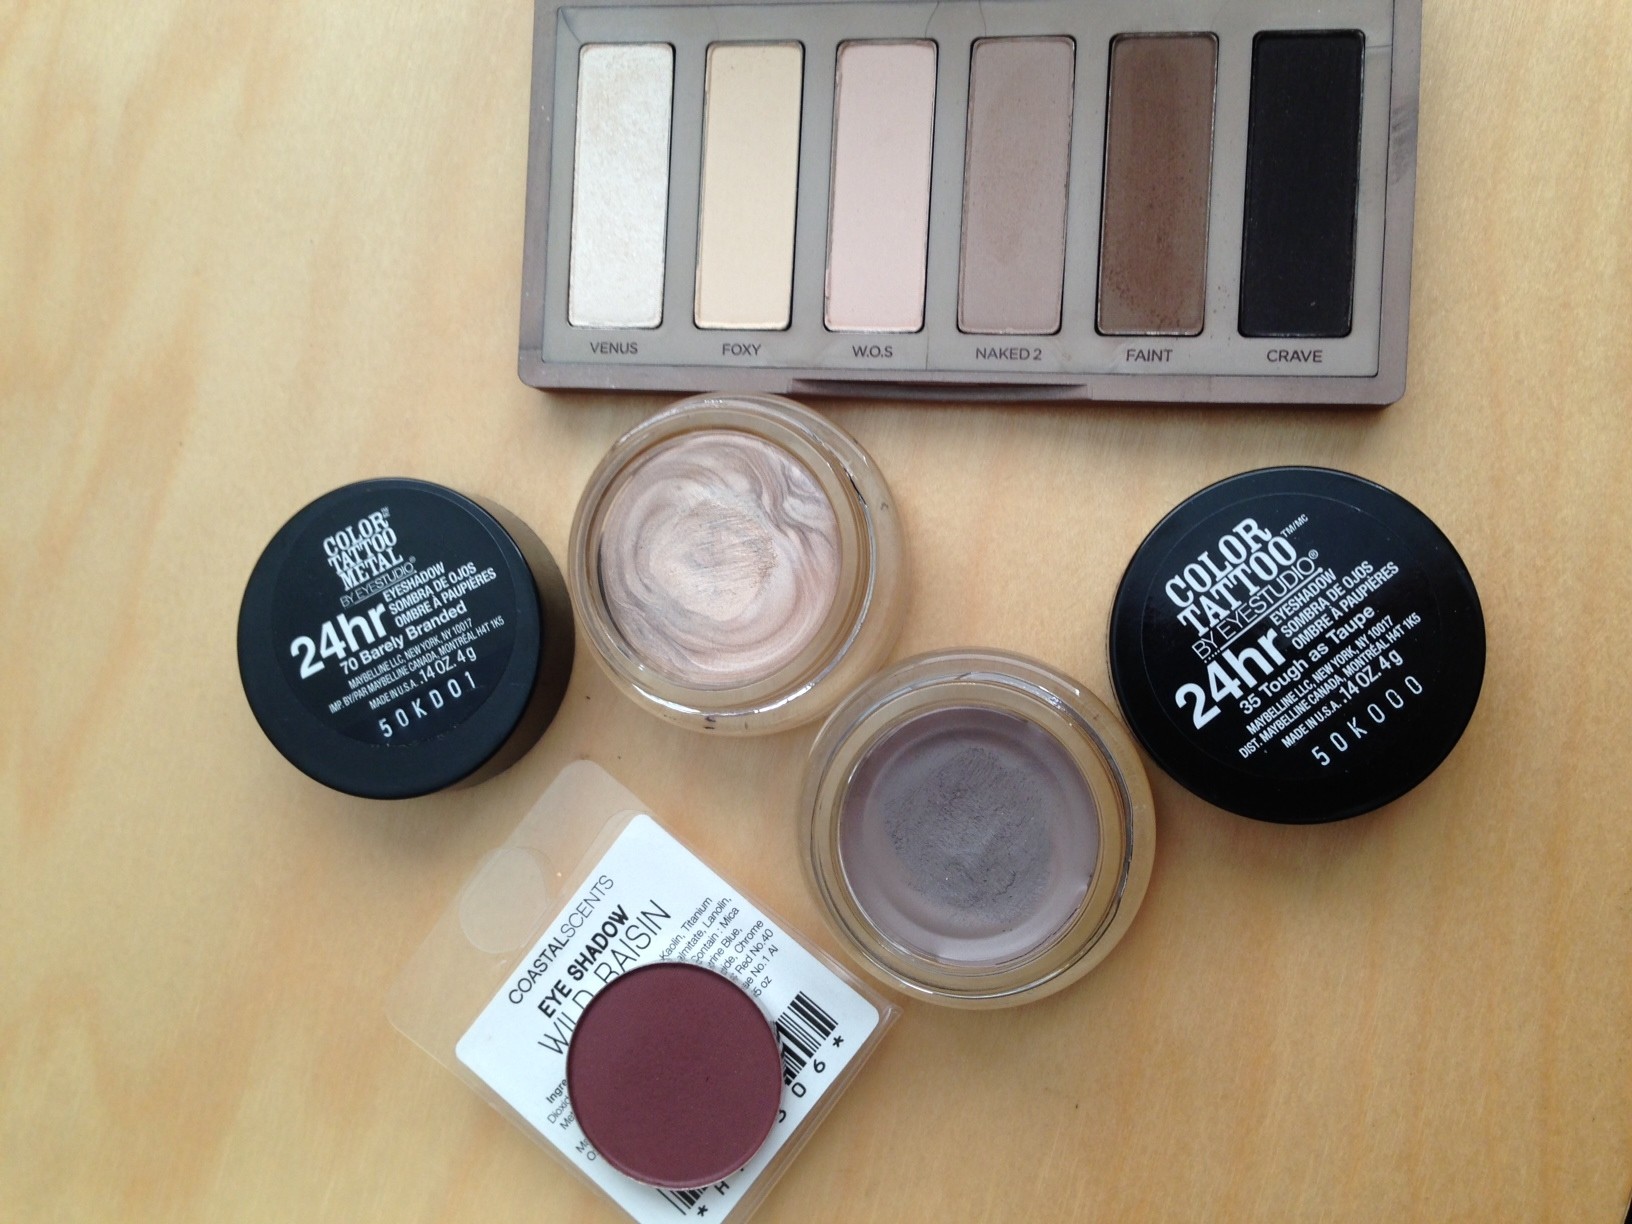
Color Tattoo Looks products

These are the colors I used for these looks. We’ve got W.O.S. from Urban Decay’s Naked Basics palette, Maybelline Color Tattoo cream shadows in Barely Branded and Tough as Taupe, and a Coastal Scents shadow in Wild Raisin.
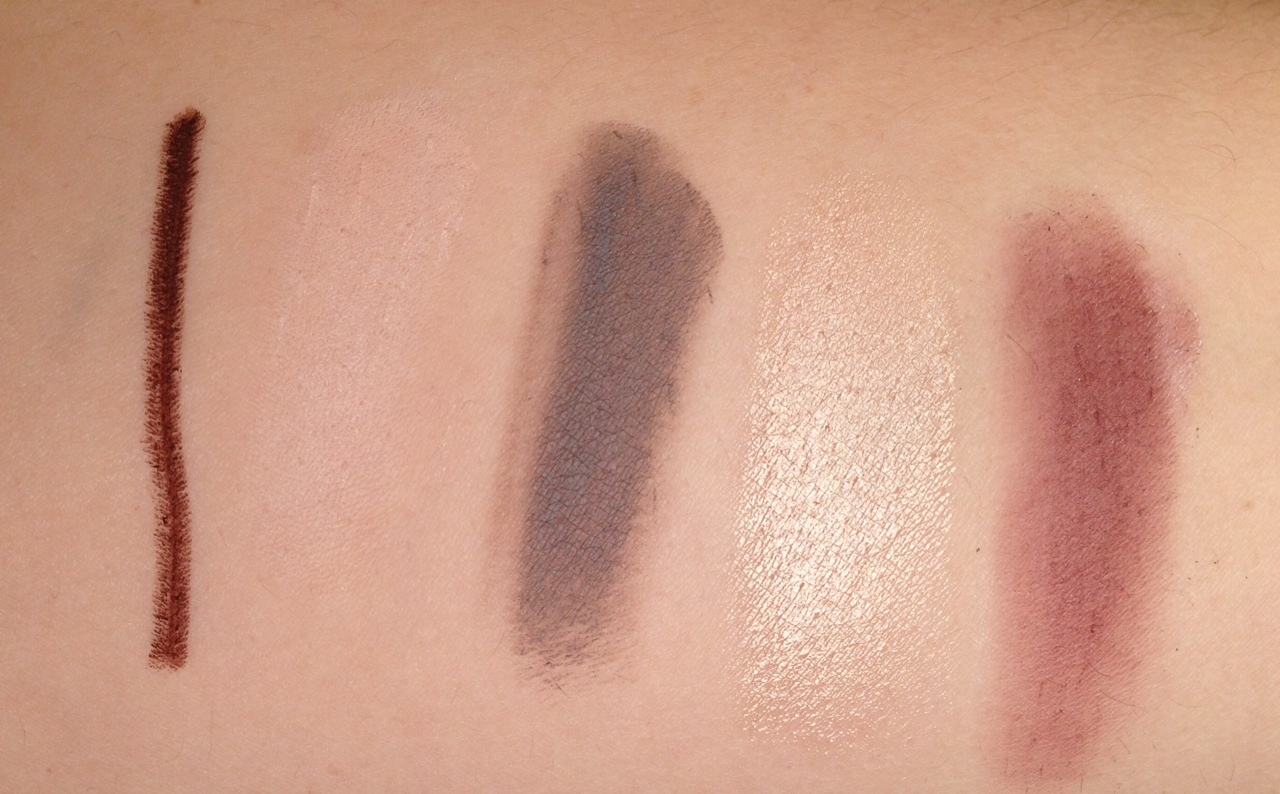
color tattoo looks swatches

L-R: Costa Riche liner, W.O.S, Tough as Taupe, Barely Branded, Wild Raisin

Before I begin, I always use my Urban Decay Primer Potion. Then, on the first look only, I used W.O.S. on the entire lid; just to even out the skin, and to give the cream shadow something else behind it. Now for the fun part!
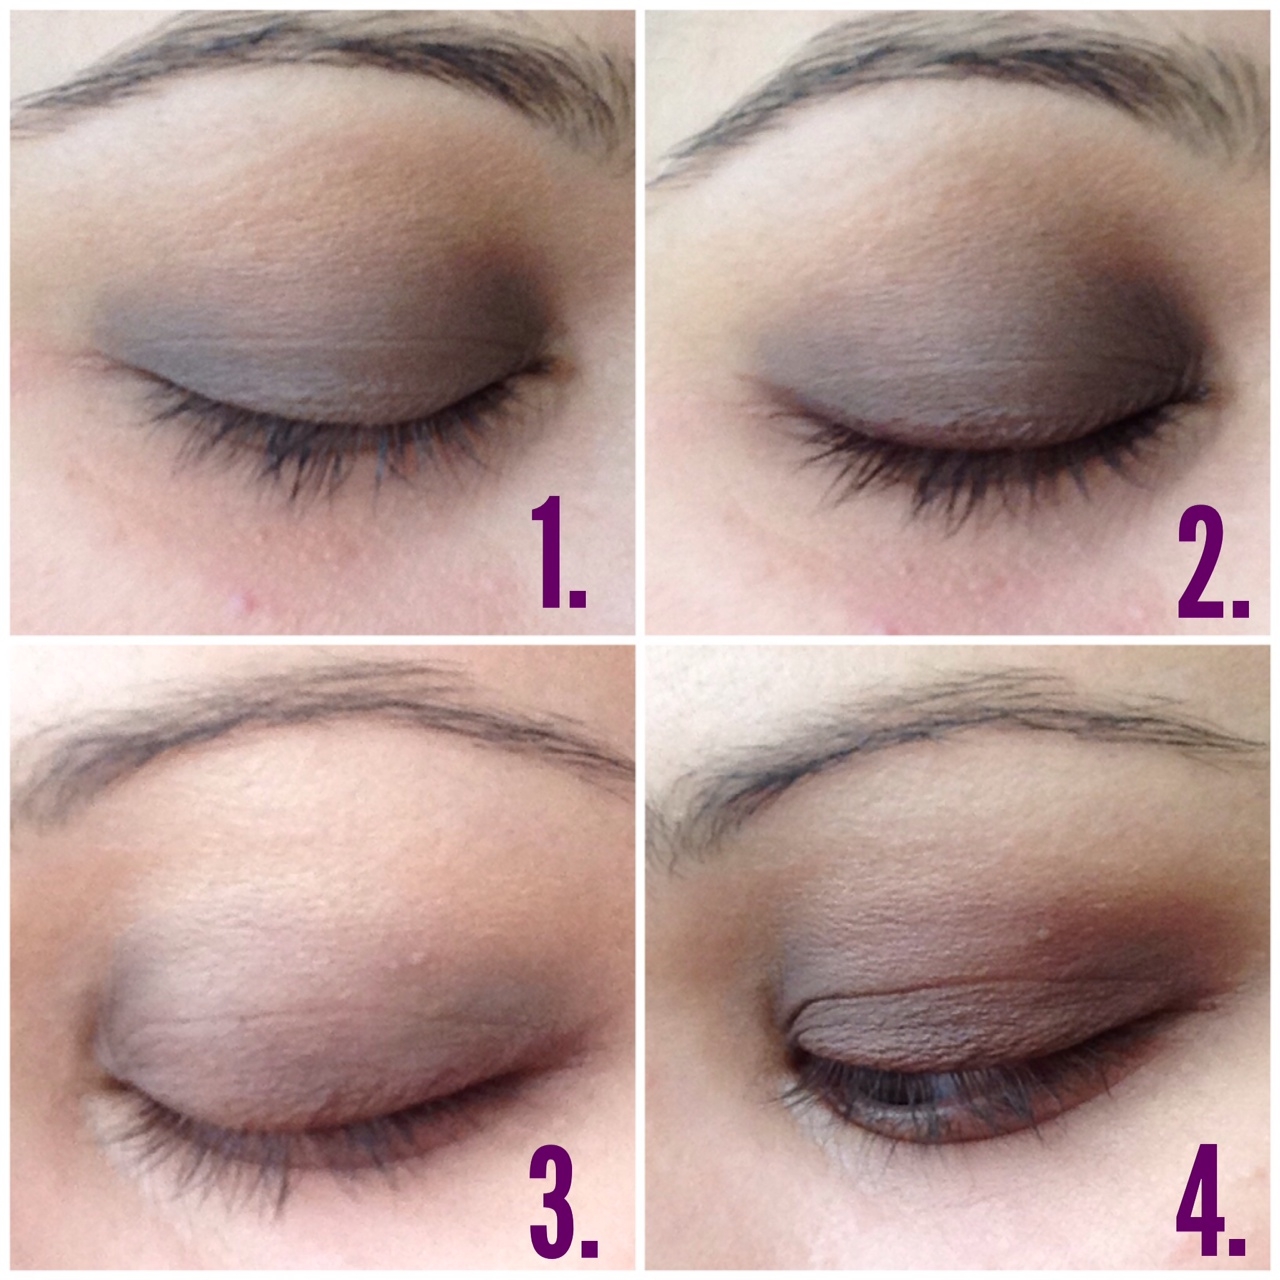
color tattoo look steps

  1. Using a flatter brush, I applied Tough as Taupe over the lid, just to the crease.
  2. Line the upper lash line and water line with a dark brown or grey liner; I used MAC’s Costa Riche. Smudge the line.
  3. Using the pads of your fingers, gently pat Barely Branded around the edges of Tough as Taupe, blending upwards and onto the brow bone.
  4. Apply Wild Raisin to the crease and the outer corner of the eye, then BLEND THE HELL OUT OF IT.

And that’s it! If you want, you can lightly line your bottom lash line with the liner or the remaining product on the flat brush from the first step. Add some mascara, and you’re done!
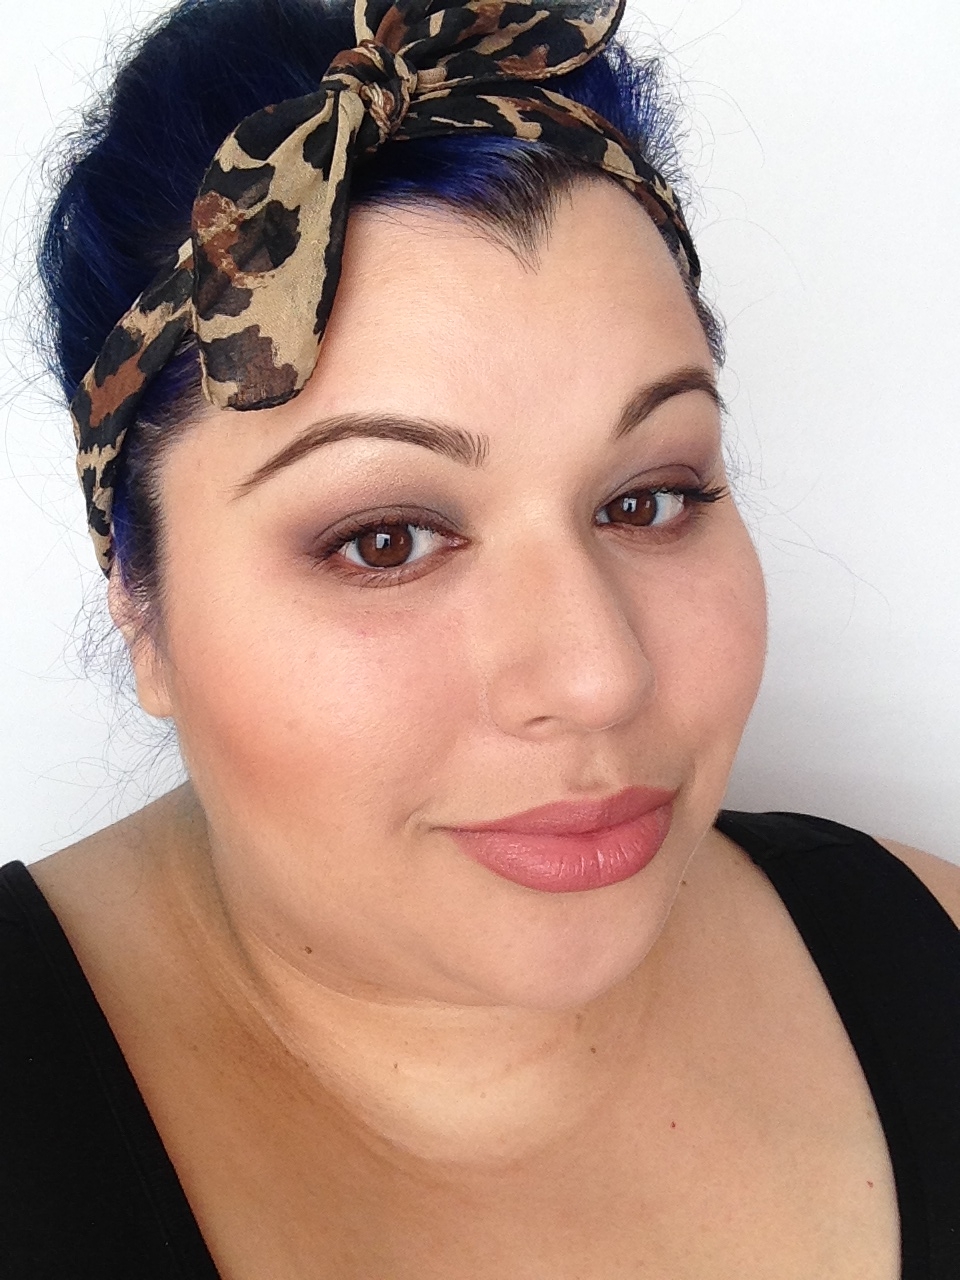
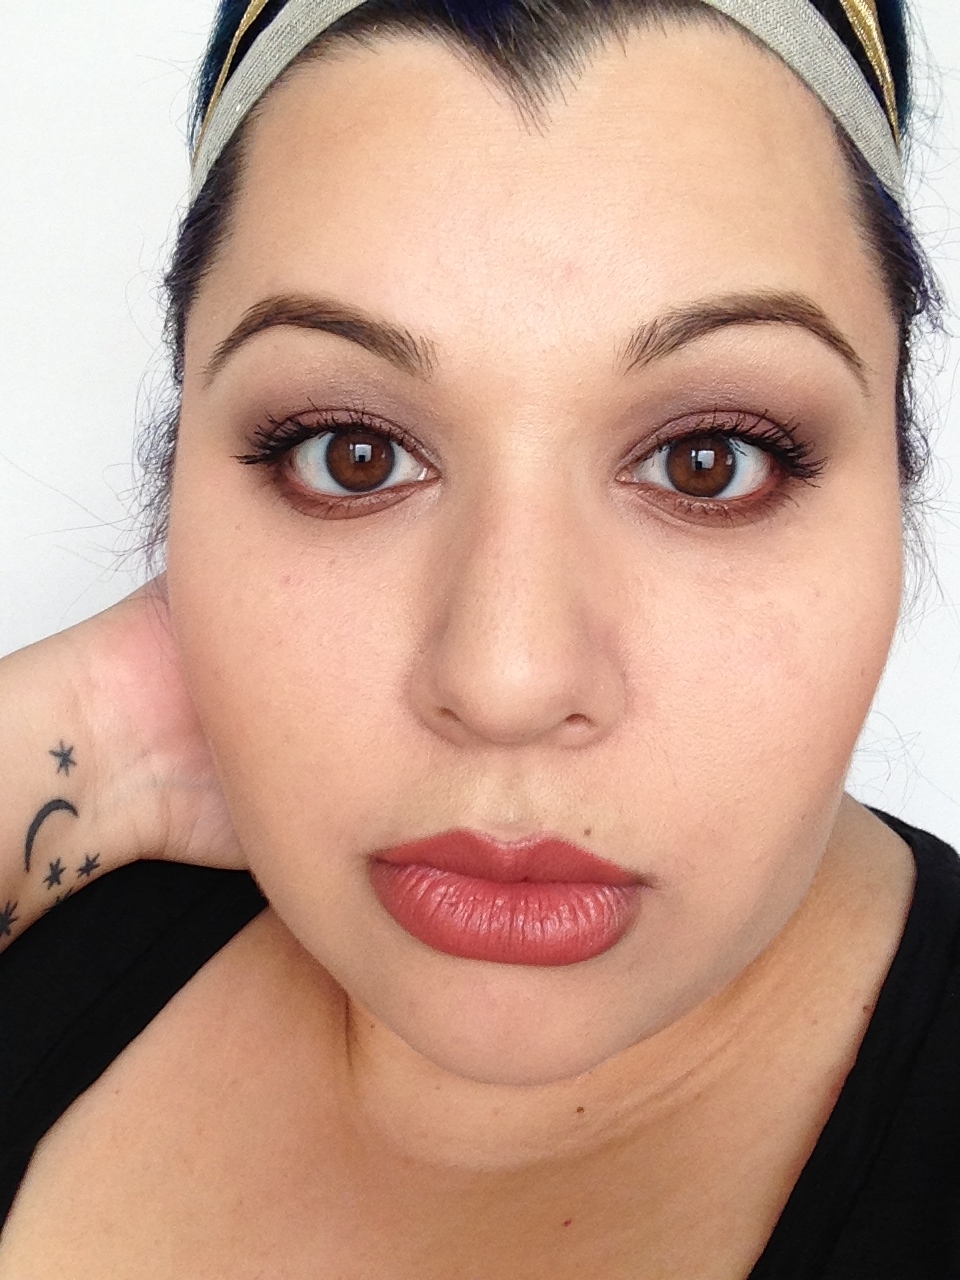
color tattoo look 1

Lips: UD’s Naked

Look Two is exactly the same as Look One, except you switch Wild Raisin and Tough as Taupe. So, Wild Raisin will cover your lid, and Tough as Taupe will get blended into the crease. It looks like this:
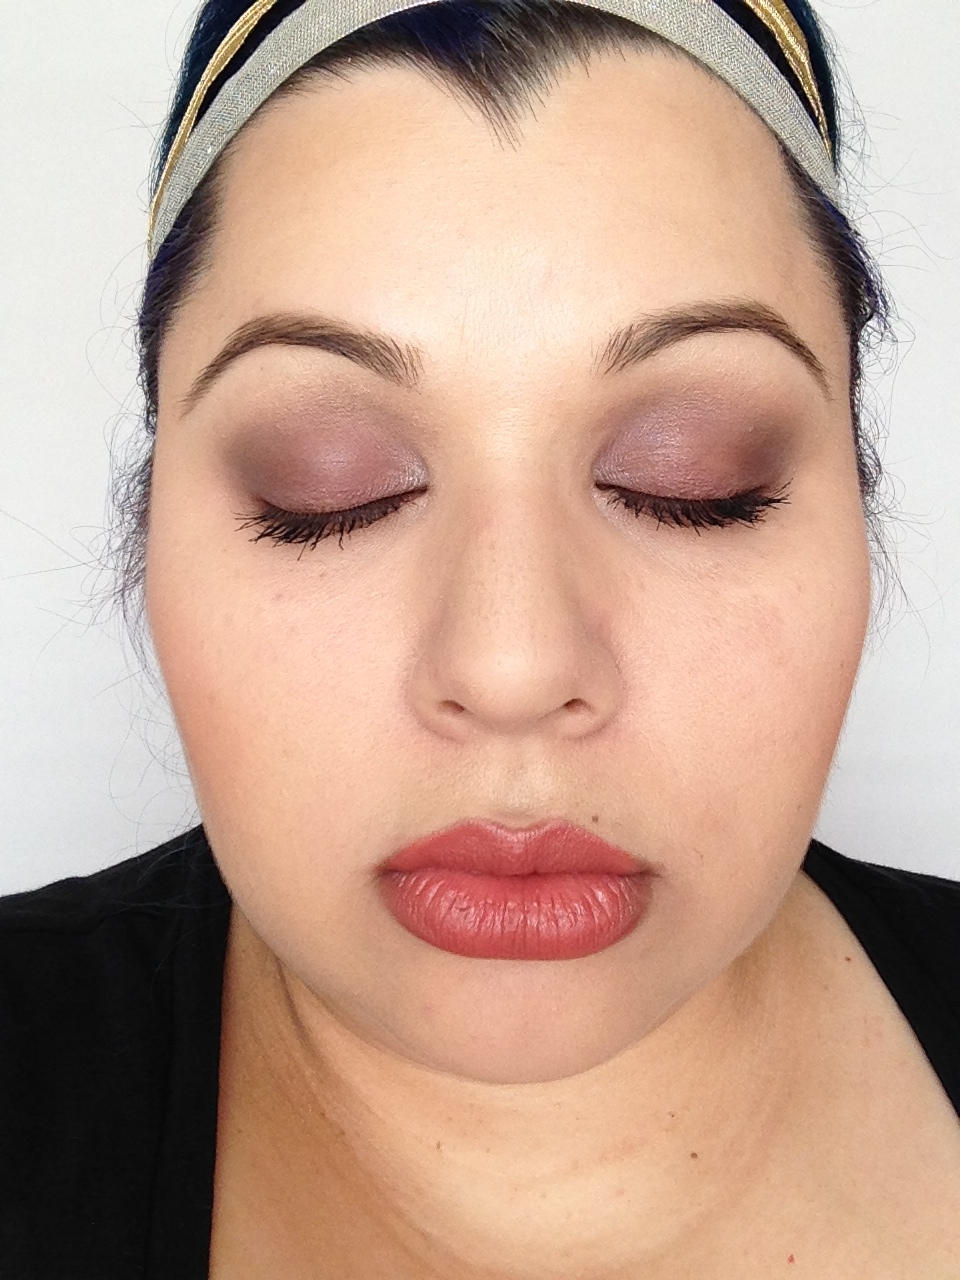
color tattoo look 2 detail

Lips: UD’s Protest

color tattoo look 2 close

I’ve worn my makeup one of these two ways almost every day since last Friday. I just love how easy and flattering it is! And how awesome is it that these shadows are super cheap? I guess the Naked palette isn’t super cheap, but that color is also sort of unnecessary to the look, so who cares?! I’ve been doing this blog for almost a year, and the one thing I’ve learned is that my makeup snobbery has been keeping me from a lot of good makeup. Maybelline, in particular, has become a new favorite of mine. I never ever thought I’d be searching everywhere for a particular drugstore product like I do with high end brands, but here I am. It’s cool though, you know. Cheap products means more products, and Maybelline is always on sale, AND you can use your Ulta coupons on their stuff. I’m rolling in affordable cream shadows over here!

What do you guys think? Do you have any questions?

Buy Maybelline Color Tattoo shadows basically everywhere.
Buy Wild Raisin from Coastal Scents HERE.

Standard
Bargain Beauty, Beauty Tools, Brushes, Coastal Scents, Face

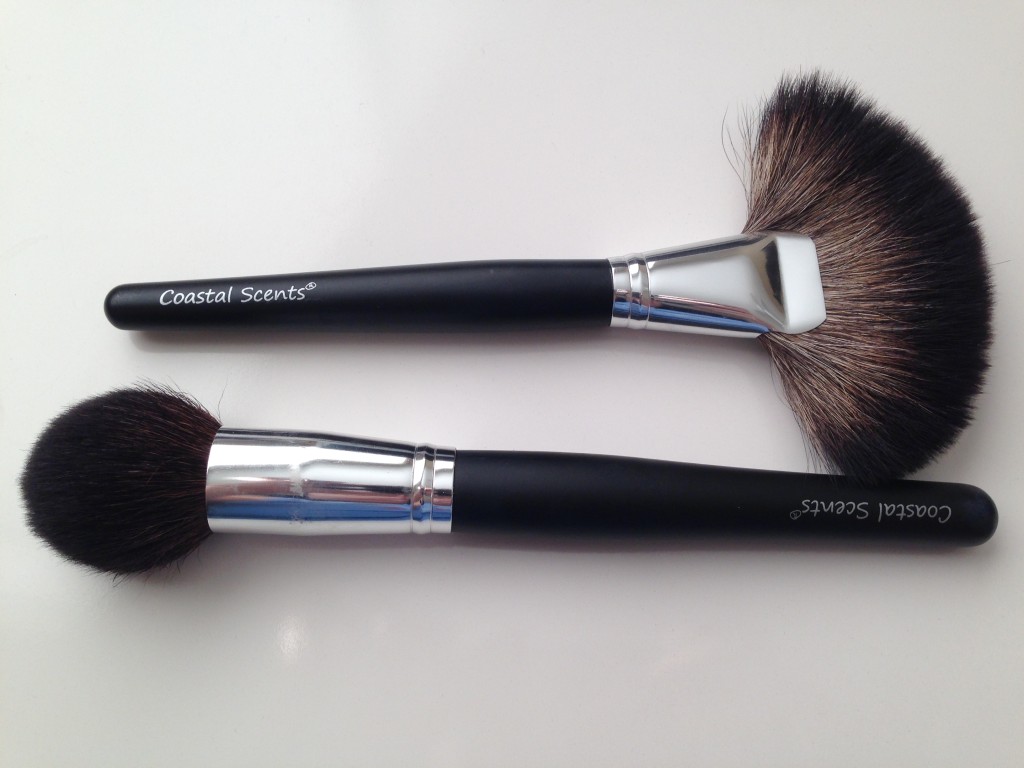
Coastal Scents Classic Fan Brush & Classic Tapered Kabuki Brush

coastal scents brushes

Top: Classic Fan Natural, Bottom: Classic Tapered Kabuki Stick Natural

I’d never tried anything from Coastal Scents before I got these brushes. I’d actually never even HEARD of Coastal Scents before this last year. I somehow stumbled upon THE DOPPELGÄNGER, and she frequently used shadows from Coastal Scents, so I took a look.

Wait. Did you go and look at THE DOPPELGÄNGER? Please. Do yourself a favor, and take a look at what she does. Her photos, her styling, her makeup, her everything is so gorgeous, it’s sick.

Anyways! Seeing the prices at Coastal Scents made it hard to pass up the opportunity to try out their products. I placed my order during their Black Friday sale; I paid $2.48 for the fan brush, and $6.48 for the kabuki brush. Crazy, right? Also seems suspicious, right? Suspiciously cheap. Like, a brace yourself for “you get what you pay for!” situation.

My order did take a little while to arrive, but, since most of the things I’ve read about Coastal Scents says they ship quickly, I’m chalking that up to a Black Friday pileup. When my order came in, I was really, REALLY impressed by the weight of the brushes. They don’t feel cheap, they feel solid. The bristles are thick, soft, and fluffy. I gave the brushes a good washing, and they held up really well without any changes to the bristles. At first, I did experience a very minor amount of shedding, but that seems to have stopped. Honestly, I’ve seen worse shedding from some MAC brushes.

The Classic Fan Natural brush was shockingly large and full. I’ve been using it as a really effective finishing brush to pop a little highlighting powder on my cheekbones, or to give my face one last pass with my HD finishing powder. It’s also great for brushing away any eyeshadow fallout you might have on your cheeks. Just sweeps it right off!

The Natural Tapered Kabuki Stick brush was also more substantial than I expected. The full, tapered brush is perfect for contouring and blending. I use it with both liquid and powder contour colors with equally great results. I knew my contouring was on point with this brush when my grandma said to me, “I can tell you’re losing weight. I can see it in your face.” My grandma does NOT hand out those “you look thinner” compliments unless she really thinks it’s true, so, JOKE’S ON YOU, NANA. I have not lost weight, I ate 3 cookies for 4th Meal last night.

Overall, I’m super happy with my brush purchase. The quality is great, and the prices are crazy! Right now, Coastal Scents is having a 40% off everything New Year’s sale. Today is the last day, but you can still get both of these brushes. I’ve found that buying and using new brushes is a great way to improve your application skills. You can learn how to get better by experimenting with new tools! Plus, hello, super fun! These prices are also good if there is a technique or type of brush you’ve been curious about, but you’ve been hesitant to spend the money. Just be sure to always wash and thoroughly dry new brushes before using them!

***UPDATE*** Both of these brushes are shedding, with the Kabuki brush being the biggest offender. I’m still using them, but I expect more shedding with each wash.

Buy brushes from Coastal Scents HERE.

Standard