Hey! How’s your summer going? Good? Shitty? Just whatever because you’re a fucking real life grown-up and summer *really* isn’t all that much fun anymore because it doesn’t change anything about your day to day life except for that now it’s a lot easier to sweat off all your makeup, and now your car is a rolling heat torture chamber? I can help with the first thing, but, I can’t do anything about that hot car thing except for maybe tell you to try to park in the shade. Maybe get one of those folding things you put in your windshield to make it look like your car is wearing sunglasses? Scratch the maybe on that suggestion, and definitely do that. Now that I’m thinking about it, I think *I* want to get one for my car! Can you imagine how fucking boss the Corolla is going to look in a pair of sweet shades? Summer may not be all that exciting for me, but things are getting very interesting for my car! Someone should make novelty windshield shades that look like real people eyes. Like, Steve Buscemi eyes or Jack Nicholson sunglasses on your car, or something. Nobody steal that idea! That’s my idea! TM!! TM!!
So, we’ve solved your hot car problem. You’re welcome.
Let’s clean up your sweaty, smeared face!
I grabbed a bottle of this setting spray during a Target frenzy a few weeks ago, and I am INTO IT. This bottle only cost me $3, but it’s working just as well as any higher end setting spray I’ve ever had.
Here’s this little thing I made to show you how well this product works. The first picture was taken in the morning, after I had just done my makeup, and hit it with the spray. The second picture was taken about ten hours later, after a day spent shopping and running errands in over 100 degree weather, and after I went to my bestie’s birthday and ate hella pizza. Hence the pizza. I think it’s important to note that I did not put on any eyeshadow primer when I did my makeup. The e.l.f. spray kept my the shadow in place and crease free. That was super impressive to me because the top half of my face is really greasy, and, without primers, my makeup usually disappears.
Where does it even go? Nobody knows.
Did I happen to mention this spray only costs THREE DOLLARS? What were you going to spend that three dollars on anyways? An app? A big Toblerone? What even costs three dollars?! Nothing good! Except that Toblerone, and this setting spray.
So that settles it! We’ve decided you’re going to buy the Toblerone and the e.l.f. setting spray! It’s only going to cost you SIX DOLLARS! GOTDAMN, you’re savvy when it comes to your dollars.
Look at your girl! She got up on time this morning, and worked it out for y’all! I didn’t just do makeup, oh no. I made a hair tutorial, too.
WHO AM I?!?!?
I’m the shit.
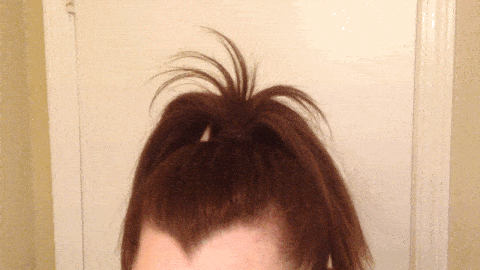
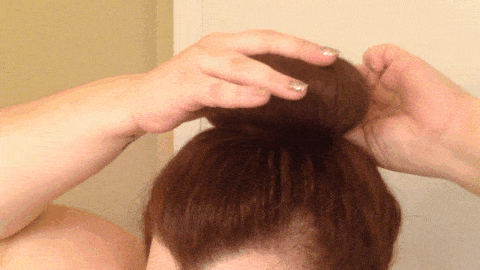
What I’m not, is a good hair doer. Like, these big donut buns have eluded me because my hair is sort of short and full of layers. That was a bummer because I do love a bun. All bunz. Lucky for me, laziness and frustration breeds ingenuity, and I figured out a way to make it happen without all the arm killing rolling, and without my layers sticking out everywhere.
Since I’m not big on hair that takes a lot of time and effort, this tutorial is suuuuper easy. Like, the whole thing will take you less than five minutes. All you need is two big hair ties (rubber bands?), a hair donut, and a bunch of bobby pins. CHECK IT OUT.
STEP ONE
Pull your hair up into a high ponytail, securing it with a rubber band. Pin up any stragglers that fall down in the back. Then, pull your ponytail through the donut, and settle it against your head. Make sure you use a larger donut, since we won’t have the volume you get from rolling all the hair into it.
STEP TWO
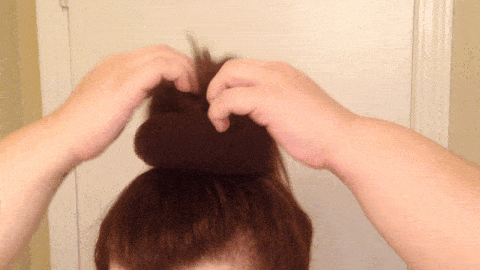
Pull the hair from your ponytail down over the donut. Making sure to evenly spread it all the way around the donut, so none of the mesh is showing.
STEP THREE
Take another large rubber band and pop it over the donut to hold the hair in place where you want it. As you can see, sometimes this takes a couple tries to get the right angle. Make sure everything is smooth, even, and covering the donut.
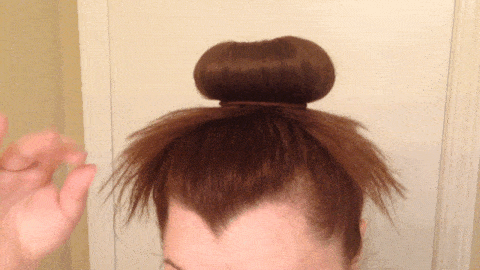
STEP FOUR
Pull the ends of the hair around the rubber band to cover it, pinning it in place as you go. If you need to, you can stick pins up into the donut. It’s super easy.
Pin the hair all the way around, adjusting the bun as you go to make sure everything is exactly where you want it. After that, I like to pull a little hair down in front of my ears just to soften it up. But, that’s up to you.
And that’s it!! It’s so easy!
I like to add a little something extra around the bun, just to make everything look super correct. This is my new twist scarf from ban.do. It has wire inside it, so it pretty much does whatever I want it to do. You can use whatever; scarves, necklaces, bracelets, cute pins or barrettes. I’d say the possibilities are endless, but that’s probably not right. You know what I mean, GO CRAZY!
Was this a revelation for anyone else?! I was so excited when I figured it out!! My normal messy bun isn’t always appropriate for all outfits and occasions. This new option is pretty great.
So, we’ve established that I love to wear a lot of eye makeup and too much mascara. We know this. So, I guess if we really think about it, we also know that I might probably go to bed a lot of nights with raccoon eyes. It’s not for lack of trying on my part. I really do try to get it off! Every eye makeup remover I’ve tried stings my eyes and/or turns my vision cloudy even until the next morning, so I resort to all kinds of other possibilities. I’ve used assorted and varied oils, I’ve tried all kinds of cleansers, I’ve rubbed and rubbed. It’s all hit or miss.
This is a problem because leftover eye makeup can cause those tiny, hard, underground bumps around my eyes. They’re not pimples because they’re not caused by bacteria. They’re called Milia, and they’re actually little cysts comprised of dead skin cells, oil and dirt. Dirt includes leftover eye makeup. I get these little bumps, and then, even though you’re not supposed to, I scratch at them. I can see them under my makeup, and they really rile up my picking tendencies. Your girl wants to party all the time, and a party for me is a really sharp pair of tweezers, an extracting loop, and a clogged pore. BUT THAT’S BAD. I know better. I went to eight months of beauty school, so, yeah, I know what I’m talking about. Call me Pimple Popper, M.D..
I don’t even really try with real eye makeup remover anymore. I tried this one kind of because it looked moisturizing, but mostly because it was half price on HauteLook and I had a credit.
I am so, so happy I took a chance! I love this stuff so much!
As you can see, I’ve been sticking my fingers all in this. It looks gross, but I think it’s good because it gives you a better idea of the product texture. It has a consistency that can best be described as “Crisco-like.” You glob some onto your closed eye, work it in a circular motion for 30 seconds (take some time to focus on your lashes), then, you wipe it off with toilet paper. If you have a bidet, use a kleenex. I was using a cotton round, but for whatever reason, the TP works better. All the makeup should wipe right off, even the mascara and liner under your eyes, and your eyelids will be moisturized! I always do this before I wash my face with my cleanser, so I wash off any excess oiliness then. It’s a dream come true!
I’m removing pigments, I’m removing mascara that doesn’t play, I’m removing black gel liner that promises 24 hour wear. I’M UNSTOPPABLE. This stuff makes me so happy because a lot of times I’ll skip a serious eye look just because I don’t want to deal with a difficult removal process that doesn’t even clean everything off. Now the only thing standing in my way is my own laziness. As usual! That’s ok, I can deal with that.
Today’s post is going to be all about my current skin care regimen. So, I decided to get right to the point and show you a photo of my makeup free face. There it is. I’m not going to do that thing where I act like I’m super grossed out by my own bare face, because, I’m not. I think I look fine without any makeup on, I just think I look better when I’m wearing mascara.
Right now, I’m pretty happy with my skin. The texture is good, the overall tone is decent. I rarely get blemishes. It’s not perfect, as you can see, I have some dark spots. I also have a little bit of redness around my nose, but that could just be hormonal. I *did* have a giant pimple above my top lip, right in the center last week. It literally popped up out of nowhere. I did my makeup, then I got in the car to leave, and suddenly, there was this huge, pulsing zit. It really gave me a lot of trouble, but it’s gone now. Unfortunately, it left some scarring/discoloration behind. This is a new thing for me. Over the last year or so, my skin has changed a lot, and I think it’s an age thing. My mom has the same problem with scarring and hyperpigmentation when she gets a particularly troublesome blemish. Whatcha gonna do? I just gotta roll with it, and try to find the best products for my changing skin.
These are the products I’m currently using. As you can see, I’m not into buying an entire skin care system from the same line. I think all of our skin is so different, it can sometimes be best to mix and match. You do have to be careful when you do this though, because some ingredients can interact weirdly, or cancel each other out. Do your due diligence and research that shit! I always read tons of reviews and information before I buy a new skin care product. It doesn’t always keep me from making a mistake, but I make them less often. When things go wrong, and they sometimes will, I just pull the new product and go back to what I was doing before. I let my skin settle down, and I try again. It’s an ongoing process, but I enjoy it. Also, I really know everyone’s return policies.
Let’s take a look at my ALL-STARS! LEFT TO RIGHT, Y’ALL!
Fresh Soy Face Cleanser – I did a complete review of this a few months ago, and I am still loving it. It’s such a nice, gentle cleanser. It doesn’t dry my skin out, and it keeps it clean. I’ve had this big bottle since June, and although I’m running low, I think I’ll make it through the end of this month. So, it’s not super cheap, but a little goes a long way. I pretty much only use this once a day, in the evenings. Either with, or without my Clarisonic. Hey, speaking of my Clarisonic…..
MY CLARISONIC! – Remember when I waxed rhapsodic about my Clarisonic? I love this freaking thing so freaking much. I love how it removes allllll my makeup, I love how it keeps my skin so soft, I love how it scrubs all my little face crevices. As far as beauty products go, it’s sort of a big ticket item. But, I’ve said it before, and I’ll keep saying it forever, they’re totally worth it. I use mine every 2-3 days, and pretty much every time I need to clean off a full face of makeup.
Pixi Glow Tonic – This baby is kind of new to the crew. I’ve been using it for about a month, and it’s been a great addition. It’s helped to clear up some rough patches, and my pores have stayed clearer. I use it every night, after I wash my face with my cleanser. I don’t wash my face with cleanser in the morning, I rinse with cool water, and then I follow that with this toner.
Ole Henriksen Truth Serum Collagen Booster & Truth Creme – I bought this set as my first shot fired in the war on my aging skin. I haven’t been using it long enough to see a difference in my dark spots, but I know I like the other things it’s doing. I use the serum first, then follow it with the creme. My skin feels soft and velvety, and it looks plump and bright. I use this system most nights, before bed.
Mario Badescu Rose Hips Nourishing Oil – I’ve written about this here before. At first, I thought this product was kind of strange. But, the longer I use it, the more I love it. Although it’s an oil, it isn’t greasy. It’s got sort of a watery consistency, and it just sucks up moisture. It sucks it all up into your skin. I can’t get enough of how good this makes my skin feel! It has helped immensely with my dry patches, and my flakiness. I use this, in the morning, on its own; and I use it under my moisturizers and treatment oil.
Badger Damascus Rose Antioxidant Face Oil – This is my treatment oil! I use this on the nights I don’t use my Ole Henriksen products, and whenever I feel like my skin needs some deep hydration. It feels nice, the price is right, and it lasts a long time!
Glam Glow Tingling and Exfoliating Mask – I’ve covered this mask here before, too. After I ran through my initial sample, I bought the small jar during the Sephora Friends & Family sale. I’ve used it once a week since then, and it has really helped to keep my skin looking clear. I credit this mask for helping to keep my nose pores under control. Those bad boys act up whenever they can. Jerks.
There it is! The system, the systo, the systrain! It’s all trial and error, guys. You just keep looking and trying and until you find the products that work for you. It takes time, but it’s worth it.
Because I am darling, I am extremely tender-headed. When I was in elementary school, my mom would brush and braid my hair in the morning, and I would cry and whine the whole time. Mexican moms don’t have any tolerance for that shit though, so she would just tell me to suck it up, while she braided faster. Hey. I get it. I’d do the same thing. What are you going to do? Not brush your kid’s hair? She had three girls to get on the bus, and no time for my nonsense. I ran through the braid assembly line just like everyone else.
I’ve never outgrown that delicate scalp. I have to grit my teeth in the salon chair a lot, and, honestly, I hate brushing my hair in my day to day life. Is that wrong? Until a few months ago, it never even occurred to me that I should be brushing my hair every day. It hurts! And sometimes, it makes my hair fluffy. In fact, the one time I do always brush my hair is the one time you’re not really supposed to brush your hair; when it’s wet. I have to though! I don’t want it to dry all tangled. I’m already never brushing it, I can’t start at a complete mess!
We all know brushing your hair while it’s wet is a weird beauty no-no, right? When your hair is wet, it’s crazy prone to breakage. Combine that with the pulling from the brush, and you’ve got flyaways, brotha. You’re supposed to use a wide toothed comb, start from the bottom, and slowly work out all the tangles. It still causes breakage, and it still really hurts!! It’s one of those things that you just do because that’s the way you do it and that’s the way it’ll always be done.
Hair that has been colored like mine has generally had to undergo a huge amount of processing, so it really needs to be handled with care. Because of that, and not at all because I just love to buy new hair products, The Wet Brush caught my eye while I was at the beauty supply picking up some things to maintain and style my new cut and color. The packaging on the brush promised it was, “The Best Detangling Brush Ever!” The girl behind the counter backed that up, saying the brushes were really, really popular. Since this particular beauty supply was a “pros only” shop, that meant that hairdressers were buying them. That was good enough for me!
A few days later, when I finally washed my hair, I got the chance to use my new brush. My hair was wet, it felt extremely delicate, and it was tangled. I tentatively pulled the brush through my hair, and it was fantastic. Fantastic! No tugging, no knots, no breaking sound, no tangles! The brush slid through my wet hair, every time, without any resistance. It’s a dream come true. Really. That may sound dramatic, and I don’t care! My tender dome is legendary in my family, it’s the real deal. A brush that makes this pain free AND keeps my hair from suffering breakage *is* a dream come true!!
The brush itself feels good to use; it’s a nice shape and the rubber coating is great with wet hands. The bristles are really where it’s at though. According to their site, the secret is that the bristles have “intelligent flexibility” so they’re “flexible on one stroke, and firm on the next.” If you say so, Wet Brush! I’m in!
The Wet Brush works great on wet or dry hair. I love it so much, I’ve even started brushing my hair almost every day. Just like the Queen of England!
I’d never tried anything from Coastal Scents before I got these brushes. I’d actually never even HEARD of Coastal Scents before this last year. I somehow stumbled upon THE DOPPELGÄNGER, and she frequently used shadows from Coastal Scents, so I took a look.
Wait. Did you go and look at THE DOPPELGÄNGER? Please. Do yourself a favor, and take a look at what she does. Her photos, her styling, her makeup, her everything is so gorgeous, it’s sick.
Anyways! Seeing the prices at Coastal Scents made it hard to pass up the opportunity to try out their products. I placed my order during their Black Friday sale; I paid $2.48 for the fan brush, and $6.48 for the kabuki brush. Crazy, right? Also seems suspicious, right? Suspiciously cheap. Like, a brace yourself for “you get what you pay for!” situation.
My order did take a little while to arrive, but, since most of the things I’ve read about Coastal Scents says they ship quickly, I’m chalking that up to a Black Friday pileup. When my order came in, I was really, REALLY impressed by the weight of the brushes. They don’t feel cheap, they feel solid. The bristles are thick, soft, and fluffy. I gave the brushes a good washing, and they held up really well without any changes to the bristles. At first, I did experience a very minor amount of shedding, but that seems to have stopped. Honestly, I’ve seen worse shedding from some MAC brushes.
The Classic Fan Natural brush was shockingly large and full. I’ve been using it as a really effective finishing brush to pop a little highlighting powder on my cheekbones, or to give my face one last pass with my HD finishing powder. It’s also great for brushing away any eyeshadow fallout you might have on your cheeks. Just sweeps it right off!
The Natural Tapered Kabuki Stick brush was also more substantial than I expected. The full, tapered brush is perfect for contouring and blending. I use it with both liquid and powder contour colors with equally great results. I knew my contouring was on point with this brush when my grandma said to me, “I can tell you’re losing weight. I can see it in your face.” My grandma does NOT hand out those “you look thinner” compliments unless she really thinks it’s true, so, JOKE’S ON YOU, NANA. I have not lost weight, I ate 3 cookies for 4th Meal last night.
Overall, I’m super happy with my brush purchase. The quality is great, and the prices are crazy! Right now, Coastal Scents is having a 40% off everything New Year’s sale. Today is the last day, but you can still get both of these brushes. I’ve found that buying and using new brushes is a great way to improve your application skills. You can learn how to get better by experimenting with new tools! Plus, hello, super fun! These prices are also good if there is a technique or type of brush you’ve been curious about, but you’ve been hesitant to spend the money. Just be sure to always wash and thoroughly dry new brushes before using them!
***UPDATE*** Both of these brushes are shedding, with the Kabuki brush being the biggest offender. I’m still using them, but I expect more shedding with each wash.
Along with Fall (my birthday, Halloween, no more bathing suits), Christmas is one of my favorite times of the year. Christmas the day is whatever to me; I love giving and getting presents, but all that cooking and cleaning can get out of here. The month leading up to Christmas is awesome though! People are nicer to each other, there are lights, and songs, and ornaments, and hot cocoa, and cookies! CHRISTMAS MOVIES! I’ve already watched “Christmas Vacation,” and “Love Actually.” I’ll hit “Scrooged” and “White Christmas” sometime soon. I’m emotionally gearing up for “Miracle on 34th Street,” and I’m saving “It’s a Wonderful Life” to watch with my mom. We like to cry together over that one. Stupid George Bailey gets me every time.
So, looking forward to Christmas, and inspired by a conversation I had with a friend, I’d like to help out with your shopping. Is my gift guide late to the party? Of course it is! Late to the party is my middle name. I actually like to BE late to parties. I wait just long enough for people to start wondering if I’m coming, and then BOOM there I am, drink in hand, making all your dreams come true.
This guide is for the budding makeup artist in your life, or for anyone who wants to improve their skills and get a little education.
I wrote about my adoration for this book a couple months ago. I’ve had my copy for nearly 15 years, and I still break it out all the time. I learned a lot about makeup application from my mom, but where her knowledge ended, this book picked it up. It’s extremely comprehensive and easy to understand, with clear instructions and pictures. Kevyn doesn’t just show you how to do eyeshadow, he shows you how to build your entire face from your bone structure up. His two makeup books are the only two I own. Nothing else comes close. “Making Faces” is an excellent guide for anyone, beginner or more experienced.
If you’re buying for a beginner, you probably want to get them brushes that are nice, but not too expensive. This Sonia Kashuk set fits the bill perfectly. Are they the most high quality, makeup artist level brushes in the world? No. But, they’re pretty nice. Every Sonia Kashuk brush I have has stood up to frequent use and cleanings without any problems. This set is a good place to start building a brush collection. It has everything a beginner should need, and some stuff they’ll probably have to figure out. That’s fun though! That’s learning! I bought a set of brushes in beauty school almost 10 years ago that had a weird shaped brush in it. I never could figure it out until just this year! Mystery solved! The new artist in your life will get a lot of use out of these brushes, and they’ll be glad to not have to use those weird sponge foam tipped applicator things. Do they even put those in makeup anymore? Am I showing my age? Wait. Does pantyhose still come in eggs? Does anybody wear pantyhose anymore?! The internet sure has changed everything!
It doesn’t look like this brush set is available online, but they have it in store. At Target’s site, you can search the stores close to you for specific products, so that makes things easy.
I JUST reviewed this palette last week, and it’s on sale now! How fortuitous! Last week, I talked about how I thought this palette would be fantastic for beginners, anyone who wants to expand their options without spending a lot of money, and anyone who struggles with palettes in general. I stand by all of that! With 30 shadows, 3 blushes and 1 bronzer, it’s got almost everything you’d need to start learning. The colors are wide ranging and beautifully coordinated with different finishes and consistencies. The palette even comes with clear, plastic instructional cards you place over the shadows to learn how to apply different eyeshadow looks. It was a great deal at $49, it’s a KILLER deal at $39. Plus, right now, with any $30 Smashbox purchase at Ulta, you get deluxe sample sizes of their fab Classic Primer and Photo Op Eye Brightening Mascara. Even better!
Throw in a couple of lipsticks or lip glosses. NYX and E.L.F. both have cheap, but good lip products. And right now there are tonnnnns of lipstick and gloss sets that are crazy cheap. Add in some brush cleanser because it’s never too early to learn to keep your tools clean and well maintained! You can get everything I’ve shown here for $85. So you can get a couple lippies and a cleanser and still keep it under $100. This will all make for a good start, and a happy makeup lover!
Look. I’m a little bit of a bullshitter when I need to be. I think I might be the World’s Smartest Lady, so I’m usually pretty confident in my ability to figure things out. I’ll fake it until I make it. Unless I think I can’t make it, then I’m all, “This is stupid!” and I quit. Who needs to keep at something stupid? Also, I can dish it out, but I can’t take it. That piece of info is neither here nor there, but, I thought since I was freely discussing the worst parts of my personality, it was worth mentioning.
What I am not faking is my ability to do a killer cat eye. I wasn’t always good though. I’ve spent lots and lots of time making a huge mess of my eyelids. But, at this point, I’ve been working at it for 15 years, so it doesn’t intimidate me anymore. I can bang out an even, perfect line in just a couple minutes. It’s extremely satisfying, and I want that feeling for you too.
I thought I’d share a couple tricks I use that might help you achieve a cat eye!
1. Draw the tail first! That’s the hardest part, but it’s easier if you do it first, and then connect it to the rest of the line. You can always build if you need to, but you’ll have a good line to follow. Pick a static, easy to find spot you can match to the other side, and start the end of your tail there. Like, line up the end of your tail under the end of your eyebrow, then do the same thing on the other side.
2. Do your bad eye before you do your good eye. You guys know what I mean, right? Your dominant hand will be the same side as your good eye. I’m sure you’ve already figured that out though. It’s way easier to match a good eye to a bad eye than it is to do it the other way around. I can’t tell you how many times I’ve drawn a beautiful cat eye on the right side, only to draw a completely different cat eye on the left side. It’s so annoying. That’s how you start down the slippery slope of, “I’m just going to even this up a little!” You know where that gets you. Nowhere good.
3. Start with a thin line. You can make it thicker little by little. This is self explanatory.
4. If you really struggle with liquid liner, consider switching to a gel liner with an angled brush. Years and years ago, when I would still take half an hour to do my liner, Benefit came out with a thin, angled eyeliner brush that totally revolutionized the cat eye for me. I used it for a long time, and it made my eyeliner so much easier, it was ridiculous. After I went back to liquid liner, I didn’t really have the same struggles. Those brushes are like liquid liner training wheels.
This one is available at Target for $5.99. I have it, and it’s solid. The angle makes it much easier to see what you’re doing, and it feels more natural in your hand. Get a little pot of liner, and you’re good to go!
5. PRACTICE! Like I’ve said here before, you might be bad at something the first few times you try it, but you probably won’t be bad on your twentieth time. If you have the time and attention span, do your cat eye, wipe it off, and do it again. Or, do it on days you don’t have anywhere to be. The experience adds up, especially if you’re working at it regularly.
These are the best tips I can think of right now. Keep at it and you’ll grab that cat by the tail, I promise
For a limited time, Sephora and Clarisonic both have the Clarisonic Mia First on sale for only $99! HALLOOOO! WE WERE JUST TALKING ABOUT YOU GETTING ONE OF THESE!
That’s my Clarisonic up thurr. It’s a beloved member of our household.
I’ve been putting off doing a post about these because they’re pretty expensive, but today is the day! This is why…
Last night, for funsies/research, I sat down and did a full face of makeup. I’m talking FACE BEAT. Foundation, contouring powder, concealer, blush, two different kinds of highlighter, three shadows, my waterproof liquid liner, several coats of mascara, lip liner, lipstick, and a finishing powder. I don’t need to tell you it was fucking beautiful. But, I will. It was fucking beautiful. Later, in the shower, I used a cleanser whose specific job is makeup removal. That’s its whole schtick. After I rinsed my face, I was suspicious of the results, my face just didn’t feel clean, so I took another pass at my skin with my Clarisonic. Would you like to guess what I found?
Tons of makeup on my brush!!! The bristles were tan!
I was properly horrified. I even shook my head in disgust.
BECAUSE I WAS DISGUSTED!
It was at that moment that I decided it was time to do my civic duty, and write my post. So, today, Friday I’m in Love with my Clarisonic!
Like most people probably do, I initially balked at the price. They’re costly, there’s no way around that. But, last night’s experiment was all the validation I needed that mine was worth the money.
I bought my brush after The Great Kiehl’s Disaster of 2010. My skin had been destroyed by a beauty experiment gone awry, and I was desperate for answers. I was breaking out a lot, and my face was dull and rough. My cheeks, specifically, were a mess. They felt thick, like scars, and I was afraid I’d done long term damage. I’d gone back to my old skincare routine, and I was exploring more drastic options, treatments, masks, etc. I did some research on the Clarisonic, convinced Jason it was practically a medical necessity, and bought one.
After my first use, there was a difference; my skin was softer and brighter even using my usual cleanser. A week after I got it, my skin showed a lot of improvement. My makeup went on smoother, my moisturizer absorbed better, and my breakouts stopped. It was the first sign of hope that there could be a turnaround on my skin. I can’t even begin to describe my relief. I was thisclose to adopting a veil over my face when I left the house like I was Blanket Jackson.
Since then, I’ve taken on a routine with my Clarisonic. They say it’s gentle enough to use twice a day, I think that’s overkill. I think using it every day is overkill. I suppose this varies by face, but all my education and real world experience has taught me that it’s very rare for anybody to really need to exfoliate every single day. If you decide to get one, you can easily figure out what’s too much; just pay attention to your skin. Be careful of any redness or soreness, and adjust accordingly. Someone who wears makeup every day should probably use it more often than someone who doesn’t. I don’t wear makeup every day, and I know my face doesn’t like to be exfoliated every night, so I use my Clarisonic 2-3 times a week. Unless I’m reviewing a product for the site, I always use it before I do masks or treatments. It gets your skin very, very clean, and I always include it when I’m wearing A LOT of makeup.
I don’t know how you can justify the price to yourself. If you never get the chance to indulge in spa facials, maybe indulge in a Clarisonic. If you struggle with chronic or frequent skin problems, maybe tell yourself you’re upping the game! To be fair, you for sure would be, so it wouldn’t be a lie. Or, how about maybe you just want one, you are a GROWN WOMAN, and you deserve it! TREAT YO SELF.
HEY! It’s time for people to give you presents, riiiiiiiight? Put it on your list! If you write it there, under “pony,” it looks totally reasonable!