A man duhh, No-Poo

Rad Hair Day

When it comes to our tech and electronic stuff, Jason’s the boss, when it comes to our hair, skin and faces, I’m the final word.

It works out pretty good for everyone. I have this beautiful site, and I don’t miss tv shows; Jason sometimes uses lotion on his face that I picked out, and I make him get haircuts. I guess. I guess that’s the trade.

I’ve got Jason on the no-poo train too, but his system is a little different than mine. I thought I’d tell you guys about it since some of you are dudes, and some of you have dudes.

Jason has super thick, really wavy (maybe even curly) hair, I have super thick hair. There’s no way our baby doesn’t come out on full Crystal Gayle status. I made us a baby, just to check, but the baby morpher didn’t have an option for “hairiness.”

baby3

Precious baby, Xenadrine, got her mom’s lazy eye and her dad’s 5 o’clock shadow.

Jason basically has the worst druff I’ve ever seen on an actual person, up close. I don’t know if the bad dandruff is something he had to adopt, back in the day, to get into a D&D guild or something, but it’s a problem now.  I mean, he would NEVER survive in Gattaca.

So, after doing more research, I’ve got him washing his hair with Dr Bronner’s Tea Tree Oil Castile Soap, and then using the same vinegar rinse I am. Both the tea tree oil and the apple cider vinegar are supposed to help with dandruff, and the castile soap is a much gentler cleanser than any dandruff shampoo he was using before. I think the castile soap still technically falls under the no-poo banner, since it doesn’t have the surfactants and chemicals we’re trying to avoid.

After a couple washes, he’s definitely got less dandruff and shedding, so this is already a success. Plus, the vinegar is making his hair look really shiny (I especially noticed that on his sexy, sparkling grays), and his curls are much better looking, and not all fluffy. I think this is a keeper for him.

I promise this will be the last no-poo or co-wash post for a little bit. I know it’s been a lot lately! I’m just like, super into doing beauty experiments, so I get excited. I get even more excited when they work! I’ll update you guys on how things are going next week, and we’ll see if I’ve gone back to regular shampoo by then.

Oh. I also made a baby for me and my very first true love, Edward Furlong. I had to use a mugshot because it was the only photo I could find where he was looking directly at the camera.

sarahandeddie

Look at our lil Mexican baby! I’m gonna pierce her ears!

I wonder if he got my letter all those years ago? My chances are probably better now! I’m going to write him another one and say, “Look. Neither one of us looks as good as they did at 14. What’s up?”

Standard
Face, How-To, Links, Video

Makeup Color Wheel

It’s the end of the day on Friday, blow off 15 minutes to watch this brilliant video and learn nearly everything you need to know to pick makeup colors that will beautifully complement your eye and skin colors.

This video is so informative, and the visuals make everything really easy to understand. Pleeeeease watch it! Trust me, you’ll be so glad you did.

Into The Gloss has a time marked summary of the video if you already know color theory, or want to get a quick idea of what you’ll be learning.

Standard
Co-Wash, Hair, No-Poo

Hair Today

I pulled the trigger on my new co-wash hair system last night, and it went pretty good!

First, before I even got in the shower, I, like, thoroughly brushed my hair with a big paddle brush. I always do this before I wash my hair. It’s my desperate attempt to cut down on the amount of hair I have to feel creepily sliding down my body in the shower. Judging by the Andre the Giant sized merkin in my drain right now, it might not work, but I do it anyways.

After I got my hair as wet as I could, I glopped a big puddle of my Suave Coconut Conditioner in my hand, and went to work on my roots. Working in sections, I scrubbed and scrubbed my scalp with the pads of my fingers, stopping to add more conditioner when I needed it. I tried to use as much conditioner as I felt was necessary to really clean my thick, longish hair. It was a lot, but what do I care? The family sized bottle of Suave cost $1.88. The need for so much product was one of my biggest problems with the Wen system. There was no way the bottle they sent was going to last me a month, and it cost $30. I’m sorry, but one of the reasons I went to beauty school was so I’d never have to pay $30 for a bottle of shampoo again.

When I felt like my scalp was good and clean, I added a little more conditioner and worked it through the length of my hair. I let it sit for a minute, then I rinsed my hair really well. From what I’ve read, the rinsing part is really important because you need the motion of the water to pick up the dirt and grime and carry it away since it doesn’t get stripped out by shampoo. Or something like that. I don’t know. I rinsed the shit outta my hair!

Then, I sprayed the apple cider vinegar/water mixture onto my hair, pulled it through with a wide toothed comb*, let it sit for a minute, and rinsed it really well.

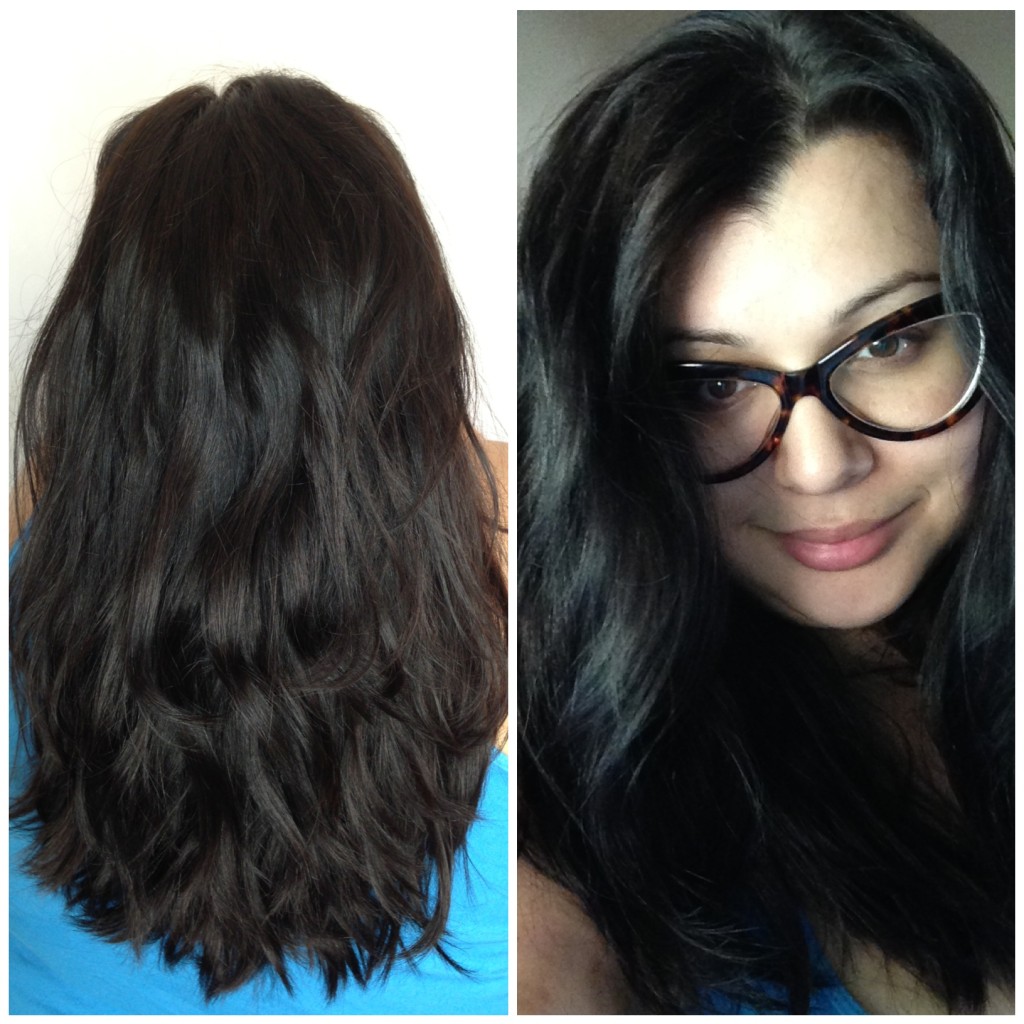
I went to bed with my hair wet, and when I woke up this morning, it looked pretty good!

cowash

Please excuse my new mystery bruise and my, once again, makeup free face.

My waves were really wavy and defined, my hair has lots of volume, and everything is pretty shiny.

UM. I just remembered I didn’t put any moroccan oil on my hair last night, and that makes this morning’s outcome even better! I was going to say it looks like it usually does when my hair dries on a really good day. But, my hair drying like this with no additional product is pretty amazing! That’s the dream, right? Hair that looks good all by itself. Like, you could walk out of any situation and look fucking gorgeous because your hair just IS fucking gorgeous.

Honestly, you guys, even if today is a fluke, and I ultimately end up with a disgusting greasy head and a jones for shampoo, I won’t care. I love doing stuff like this. It’s so much fun. And besides, I’ll never know if it works if I don’t try it! That’s my motto. Worked out for me with Weight Watchers and vodka, why not co-washing?!


*You really shouldn’t put any combs or brushes in your hair when they’re wet. I was just checking to see if the vinegar was really detangling like the internet said it should. It was.

Standard
Hair

ShamBOOOOO

When it comes to my beauty regimen, I’m never satisfied, and I’m always trying new products. But for my hair, I’ve sort of been stuck using Head & Shoulders not matter what. I don’t know if I really have dandruff, because the H&S never completely clears anything up. Any other shampoos I’ve tried have definitely made things worse though.

druffqueen

That’s me. Weirdo dandruff queen/compulsive liar.

So. I’m going to stop using shampoo altogether.

I’ve been hearing for years that adopting the “no-poo” method will do amazing things for your hair. Supposedly, cutting harsh surfactants and detergents out of your haircare regimen can clear up dandruff, make your hair shinier, smoother and stronger, and can make curly/kinky hair more defined and manageable. That all sounds too good to be true, but when you start looking into it, it makes sense! So, I figured I should just go for it. If my hair turns greasy and/or disgusting, I can just say it’s for science and people will have to MIND THEIR OWN BUSINESS.

Here’s what I’m going to use if you want to try it with me:

I’m going to start washing my hair with Suave Naturals Tropical Coconut Conditioner. While I was researching the no-poo  method, this conditioner kept coming up. It’s supposed to be great for cleaning your hair without stripping away necessary oils. I got my bottle at the grocery store, it was practically free it was so inexpensive.

In the shower, I’m going to wash my hair with this conditioner, really thoroughly scrubbing my scalp with my finger pads to break up any dirt or grease, before rinsing like normal.

Then, I’m going to condition my hair with an apple cider vinegar rinse. The apple cider vinegar is supposed to detangle, and seal the cuticle, making your hair really shiny. It’s also supposed to help with the dandruff issue.

You’re supposed to use a raw, organic apple cider vinegar; I bought Bragg Organic Apple Cider Vinegar at one of my local health food stores. Then, I mixed up a 1:1 ratio of vinegar to water and put it in a spray bottle.

After co-washing (co-washing means “conditioner washing,” and it doesn’t make me cringe with embarrassment like the words, “no-poo”), I’m going to spray the vinegar rinse on my hair, let it sit for a minute, then rinse rinse rinse so I don’t smell like a delicious salad dressing.

I like that both of these products were cheap and easy to find. As much as I love having things other people don’t, I really hate having to search all over for something simple I’m trying to buy. I get resentful of products that make me do a lot of work just to fork over money.

*****

It’s supposed to take a few weeks for your hair to adjust to having to overcompensate for the oils being regularly stripped out of it, so you might be greasier than usual. I plan on putting my rubber bands, claws and hair ties to work on keeping it looking decent.

OR

This look is due for a comeback!

addicted to love

Anybody else want to do this with me? It might be cool to get a few other different hair types, lengths and styles in on this! FOR SCIENCE.


You can read a lot more about the co-washing method  HERE. That post has the answers to pretty much any question you might have.


Standard
Floss Gloss, Nails

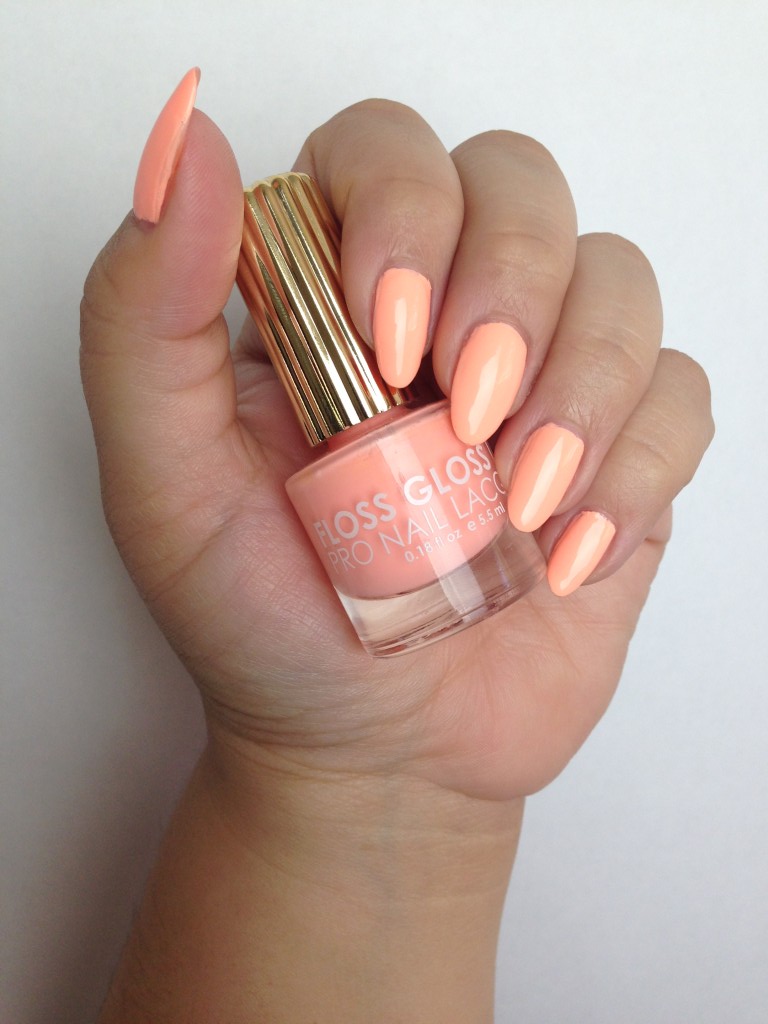
Floss Gloss Lacquer in Pony

flossglosspony

Pony, Floss Gloss, $8

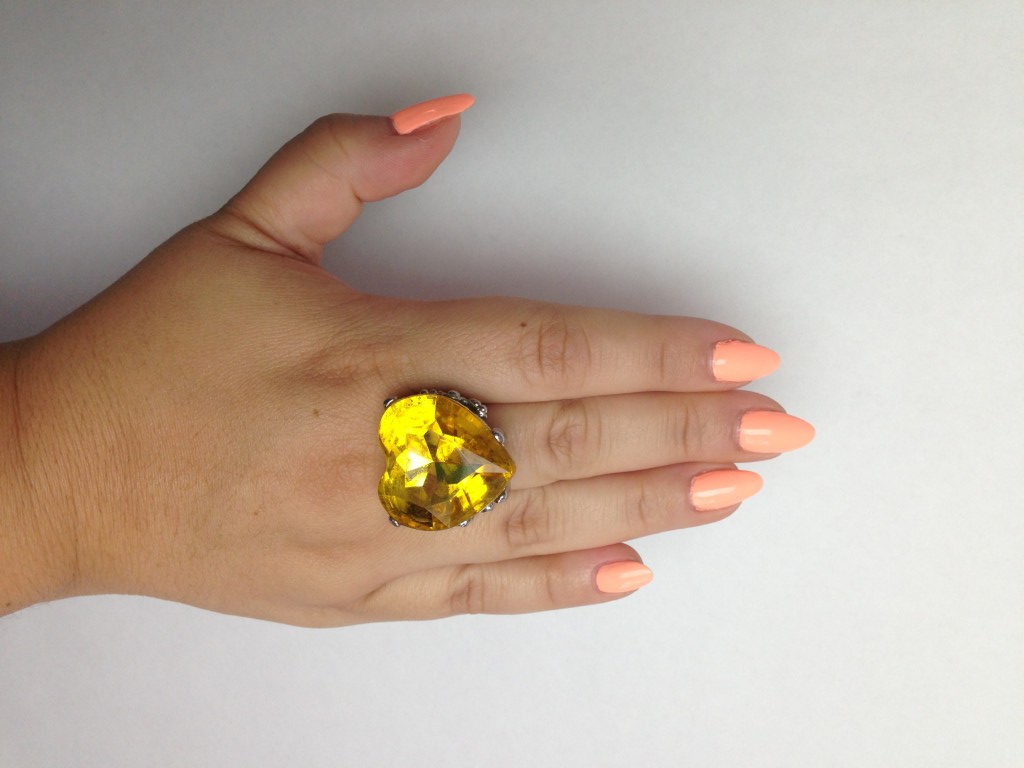
Floss Gloss is really good at introducing colors I didn’t know I desperately needed. Neon peach is not a color I would have considered for myself before I got Pony, but I’ve fallen in love with it.

flossglosspony2

What are you, kidding me? How hot is this?! It’s apt the color is called Pony because it’s amazingly sexy and it reminds me of one of the horniest songs of all time, “Pony” by Ginuwine. A hot thing to do, would be to dance a sexy striptease to “Pony” while you run your Pony tipped fingers all over your sexxxay boddday. BAM. Unstoppable.

This color make me look super tan, and it gives me, what I like to call, DIVA HANDS or LADY HANDS. Like Babs.

babsnails

OG DIVA NAILS

This is my third bottle of Floss Gloss polish. I’ve been wearing their colors, exclusively, for almost a month, and they’re all great. Combined with my base and top coats, I’ve gotten at least a week’s wear, without chipping, from each bottle. I really appreciate that, especially since chips are so much more obvious on bright colors. I’ve also noticed that, during all three manicures, I thought I messed up the wet polish enough to warrant removal and re-polishing, but by the time I’d finish the top coat on the rest of my fingers, that bumped, smeared, or otherwise gooped up nail would have leveled itself out to the point that I could just put on top coat and everything was perfect.

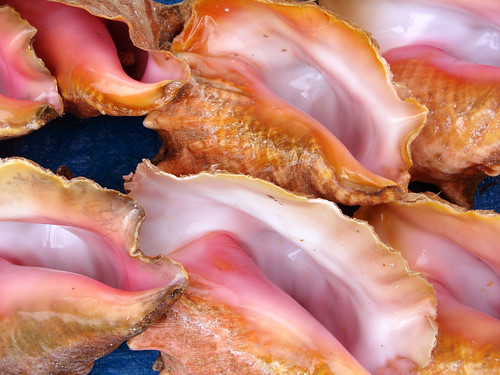
My camera couldn’t do this color justice. In some light it was brighter and orangey, in some light it was a soft pink, in photos, it was more nude. All week, I’ve been wracking my brain, trying to remember where I’d seen this color before.

Last night, it finally hit me.

Conch

All the shades I’ve seen in Pony, you can see here.

WHEW! THANK GAWD I was able to nail it down. It was driving me crazy!

Besides being dope as hell, Pony is just flat out pretty. I actually had the thought to myself that I wished I could go back in time and wear it at my wedding.

I’m legitimately sad to have to take this polish off to swatch another color.

Buy it HERE.

Standard
Maintenance, Nails

ASP Nail Wrap Kit

Did you guys know you could patch a torn natural nail? I didn’t. All these years, I’ve been breaking one nail and then mournfully cutting off the other nine. Finding out now that things could have been different all along, well….it smarts. Growing out your nails is hard work! You can’t open soda cans, umm, you have to wear rubber gloves when you wash dishes, you have to be careful opening doors and stuff. Like I said, hard work!

Almost 2 weeks ago, I found a little tear in one of my nails. It was the kind that was up in the pink, so you know it’s bad. Not only are you going to lose your nail with one of those tears, but it’s going to hurt like a mother in the process. Then, you have to deal with that soft, pink, nail bed. It’s like a turtle without a shell! Just all exposed and sad. I’ve been growing out these nails since my white manicure, and I was not going to let them go without a fight. After a little internet sleuthing, some television, maybe a nosh, I headed for the Sally Beauty closest to my house to see what I could work up.

SIDE NOTE: Do you guys dislike going to Sally like I do? Maybe it’s because I usually beauty supply shop in the pro shops (ASSHOLE ALERT), but the Sally stores, and most of the girls working in them, are kinda tacky and dated. Am I just a snob?

8ball

Damn.

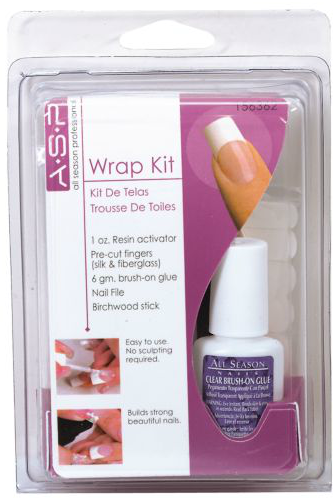
During my investigative process, I found people saying you could fix a nail with fiberglass nail wraps and nail glue. So, at the beauty supply, I ended up buying this ASP Nail Wrap Kit. I *think* it’s for doing at home acrylics, but it has everything in it, besides alcohol, you’d need to do a nail repair.

Screen Shot 2013-06-24 at 9.47.15 AM

ASP Nail Wrap Kit, Sally Beauty, $14.99-$16.99

This is so, so, so easy. Stupid easy. You’ll be shocked!

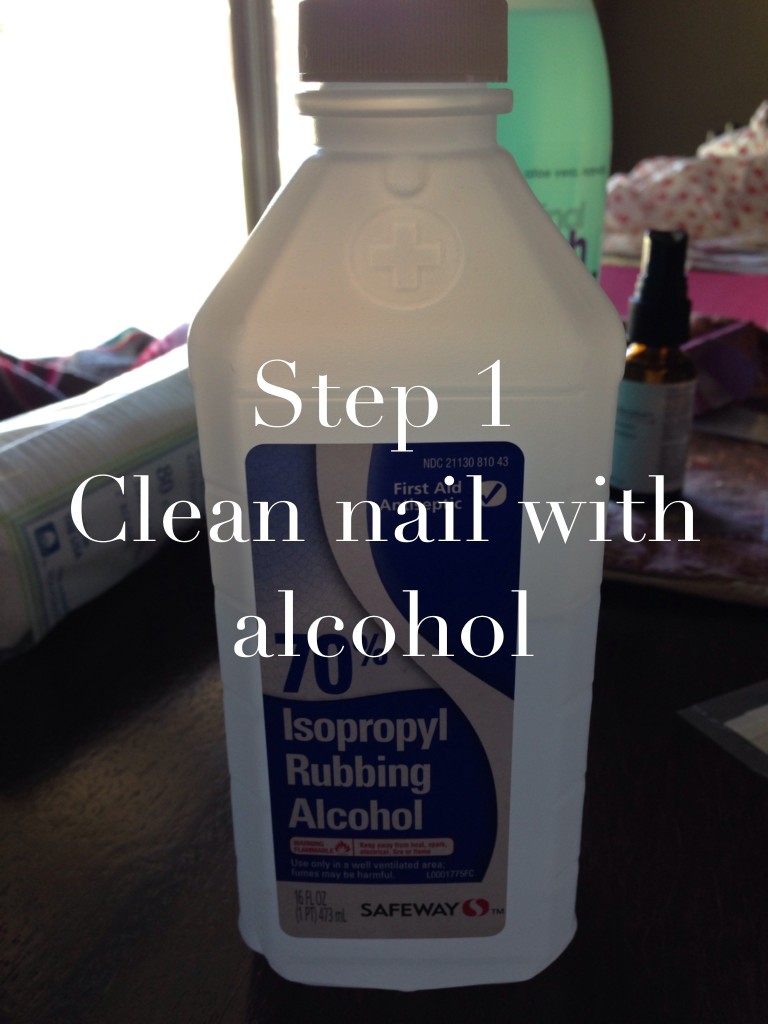
First things first, gather up your supplies. Besides the kit, you’ll need little scissors, tweezers, rubbing alcohol, cotton balls, a paper towel, a plastic shopping bag, and a nail buffer. I use this buffer.

This particular kit comes with “resin activator” whatever that is. I didn’t show you those steps, because I don’t think they’re necessary. You could just buy nail glue and fiberglass nail wraps to do this if you don’t want to get the kit.

The only pre-steps warnings I have are these: DO NOT touch your nail with your other fingers after you’ve cleaned it. Be careful not to touch the wraps themselves too much too. You really don’t want any finger oils compromising your patch. AND, the paper towel is for under your work area. Come on, be responsible. Don’t flick nail glue all over your table.

Last warning: pee first. That’s good advice for all nail work right thurr.

nailfix1

This part is so important. You have to remove any oil from your nail, or the patch won’t take. Clean your nail in the direction of the tear, so you don’t make it worse.

nailfix2

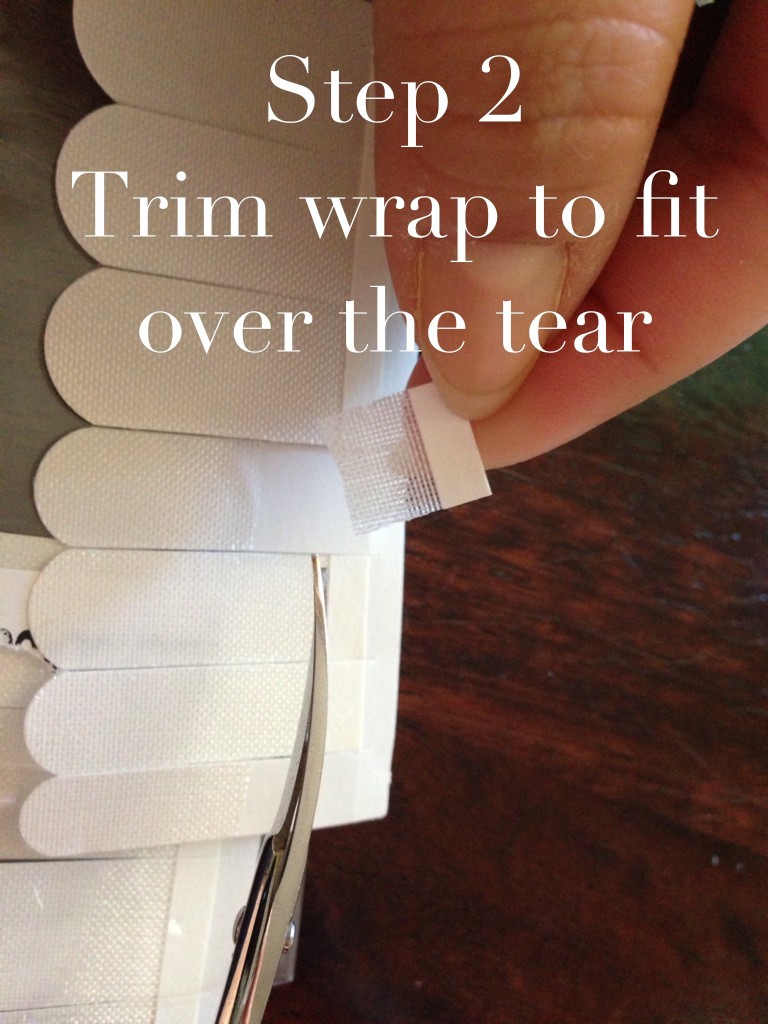
Trim just enough to cover a little past the tear, and enough to wrap under if you can.

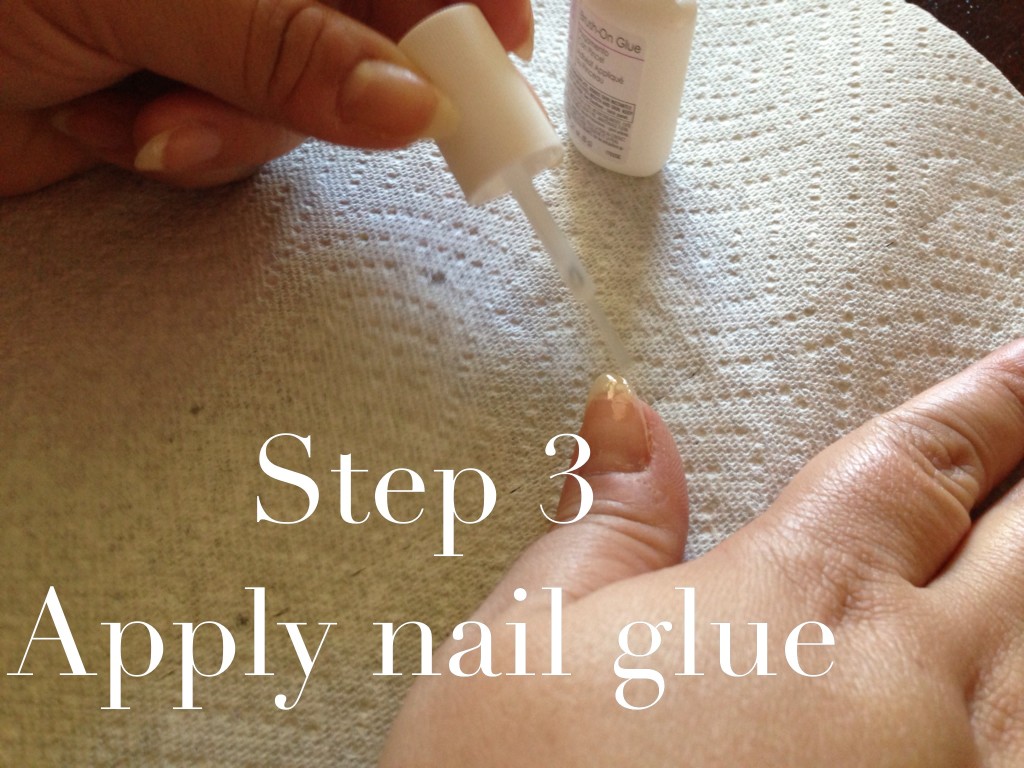
nailfix3

I didn’t put it on my entire nail, just the area with the tear.

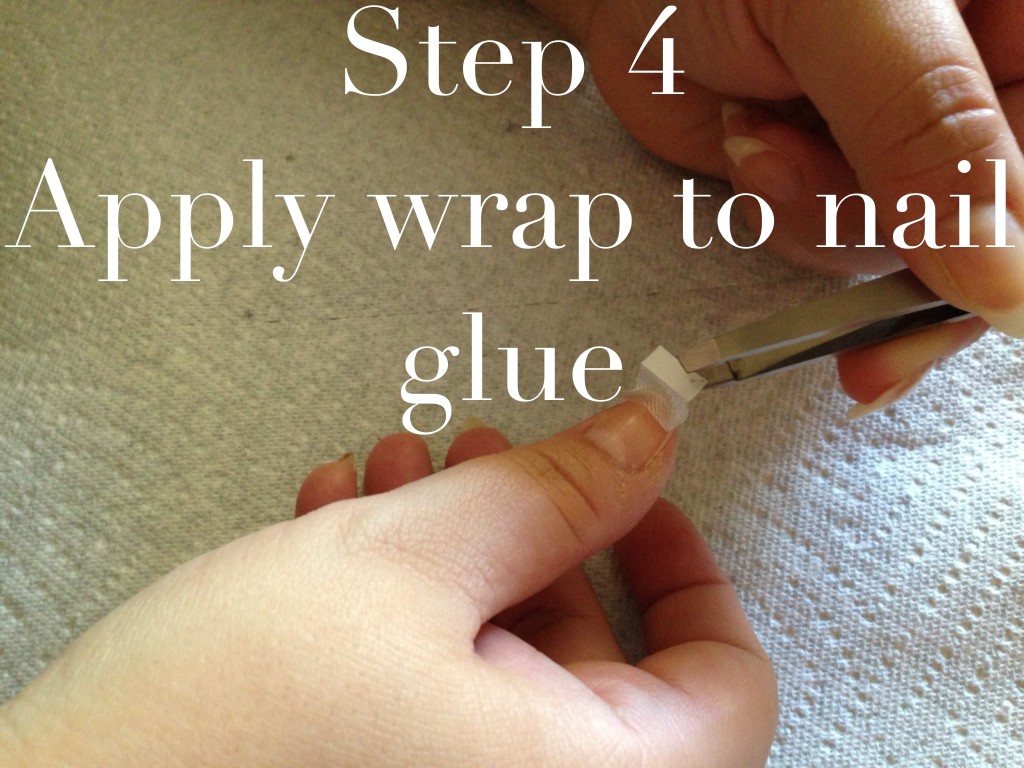
nailfix4

Use your tweezers to carefully place the wrap. Don’t use your fingers. Oils!

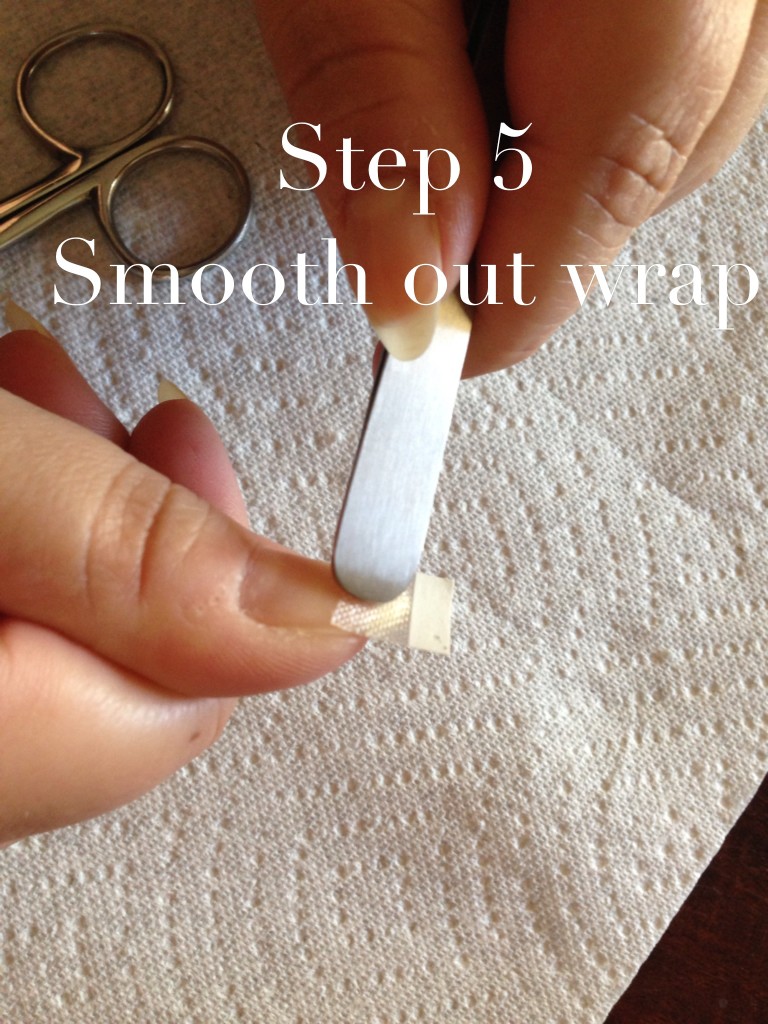
nailfix5

Using your finger inside the plastic bag, or the round end of your tweezers, smooth out the wrap.

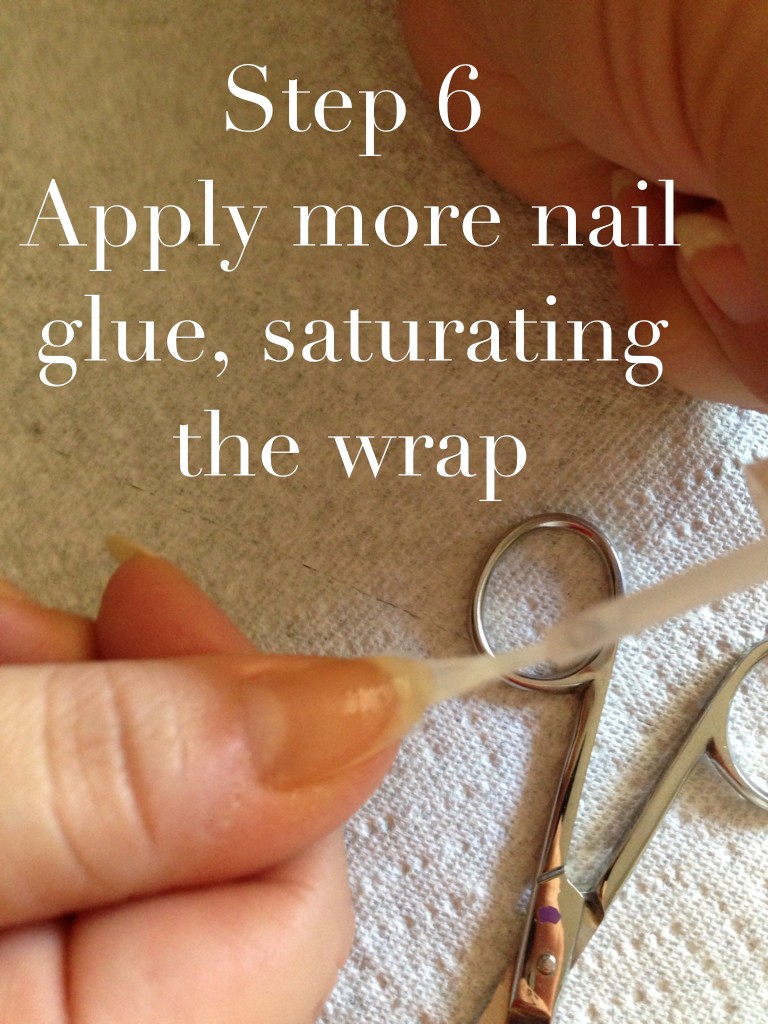
nailfix6

Don’t glob it on, but be sure the wrap is fully saturated and smooth on the nail.

nailfix7

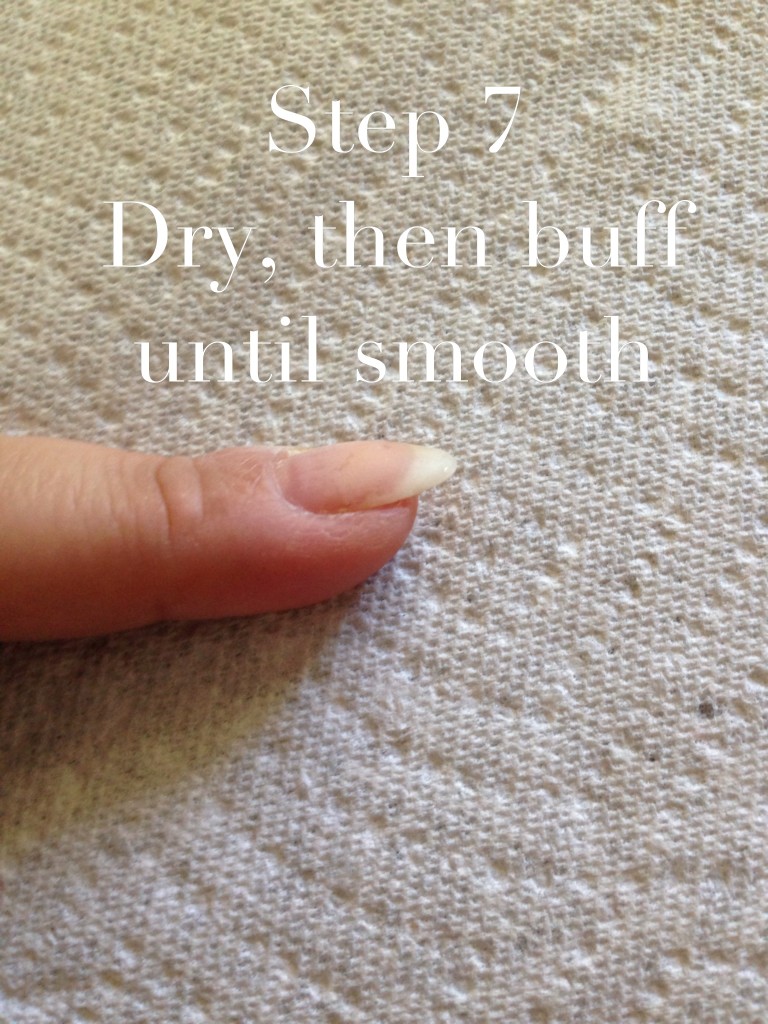
When the glue is dry, about 15 minutes, using a nail buffer, buff the nail until all the shiny spots are gone.

And that’s it! It might seem like a lot of work, but once you get the hang of it, not counting drying time, it took me maybe 2 minutes per nail. Way less time than it takes me to trim and shape all ten nails, and way less time than it takes to grow out a new one. I’ve had 2 patches on for nearly two weeks, and they don’t show any signs of lifting, peeling, or failing. My patched nails are all still intact, and under polish, you can’t even tell they’re there. Even without polish, you can’t really see the wraps.

Isn’t this so exciting? This is a whole new innovation for me. Nail repair! The way of the future!


Standard
Beauty Tools, Face

Brush Up, Part 3

AKA THE BRUSHENING.

Ok. We’ve covered all the basic brush essentials, and now we’re going to get into some brushes that aren’t necessary if you’re a meat and potatoes kind of makeup person. If you are, I don’t know what you’re doing here. I deal in excess, honey. Always, always, por vida.

These last three tools don’t come out for every face, but they always make an appearance for a going out face, or a photo face. I don’t highlight and contour to go to Target, I can barely manage to convince myself to put a bra on.

RELATED: Yesterday, I went to Starbucks at 7:00 AM without a bra on, but nobody could tell because I kept my arms crossed over my nips. Pretty smart, huh? Nobody every knew what I had under there.

Yuck. I can’t stop thinking about meat and potatoes makeup.

Let’s go.

brushhighlight

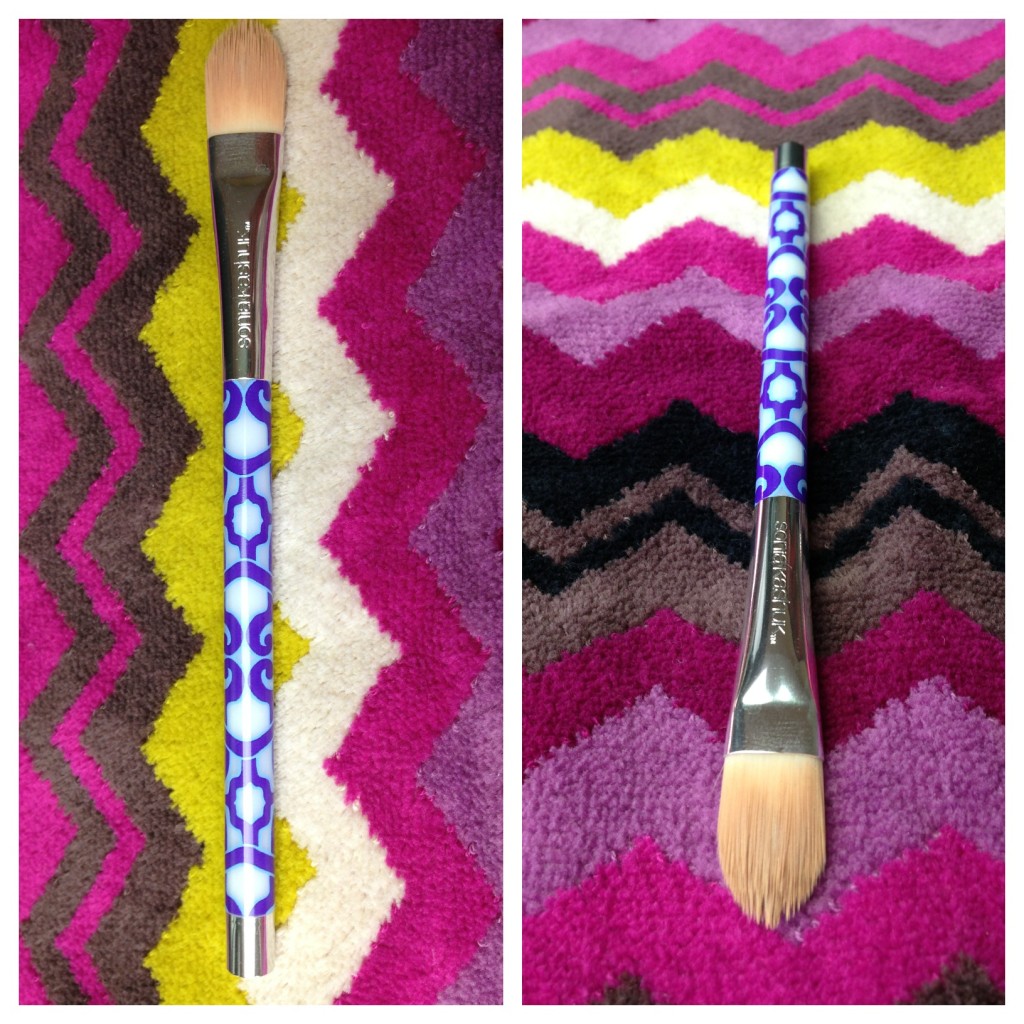
Sonia Kashuk Concealer Brush, Target

I love this brush for precision concealing and highlighting. The pointed tip makes it so much easier to get in the small areas under eyes, and the nose.

Like I said, I don’t always use highlighting, but when I do, working with product off the back of my hand, I highlight around the eyes, down the center of the nose, chin, and sometimes above the mouth. You use highlighter on and around the things you want to accentuate, to bring attention to them and make them more prominent.

This brush also came out of a set, but this Sonia Kashuk foundation brush would do the same job.

brushhighlightpowder

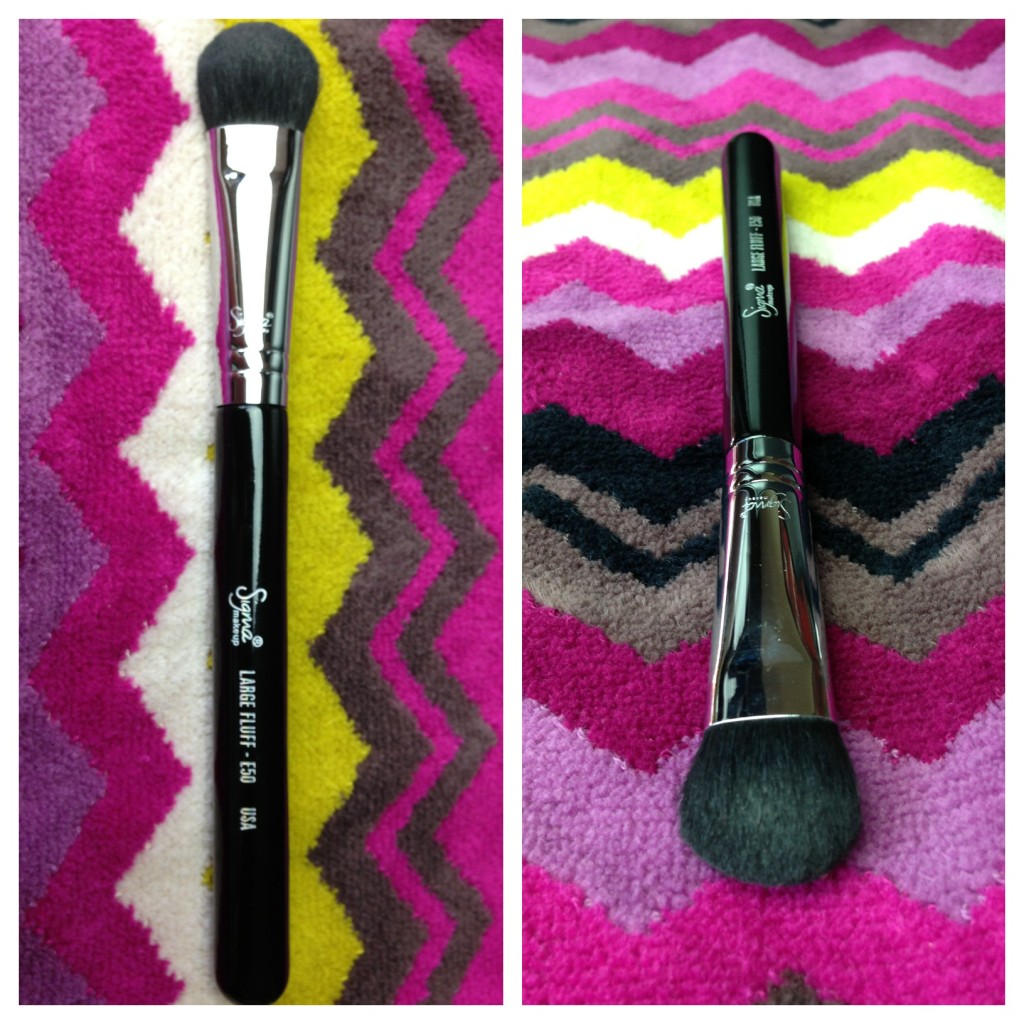
Sigma Beauty, Large Fluff E50, $12

Never  walk away from your makeup without dusting powder over concealer or highlighter colors. It’s the law. And you, my friend, are not above the law. What do you want? Dusted or busted? Don’t get busted or you’ll get thrown in beauty jail. You and other beauty offenders (eyebrow manglers, hair crunchers, felony non-moisturizers, and repeat dick wagglers [regular jail was full, beauty jail is coed]) will be behind bars, and don’t bother having someone bake a cake with a file in it, they know all about that.

I use this brush to stay out of beauty jail. A light brush of translucent finishing powder makes your concealer smoother and keeps it in place.

brushbeautyblender

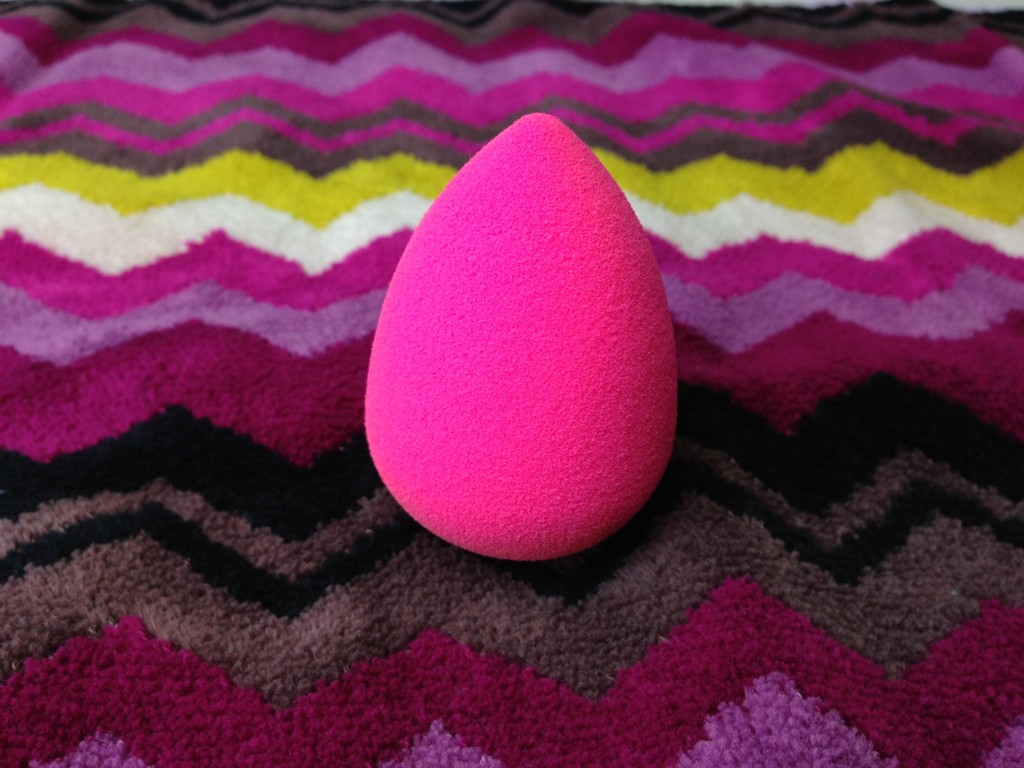
Beautyblender, Amazon, 2 for $21.47

I love everything about this little tool. It’s adorable, it feels good in my hand, and it works beautifully. You can use it dry or damp to apply foundation or blend, I prefer to use it damp. Using it to apply foundation gives a soft, smooth, and almost airbrushed finish; while the dampness of the sponge stretches your cosmetics and gives great build-able coverage. I sometimes use it damp, with no makeup, to press over my finished face and blend any edges or lines that may still be present from contouring and give everything a seamless look.

The name brand BeautyBlenders are kind of expensive, and they do sell similar sponges at Sephora and Target, but I can’t vouch for them. They’re just sponges, right? What’s going to happen? They blow up?

*****

I hope everyone found this series helpful! Good brushes can come from all kinds of different places. I have and use brushes that came from makeup counters, drugstores, and art supply stores, just keep an eye out and you’ll curate a great collection too.

Are there any brushes or tools you’re curious about or any problems you’re having with current brushes? Does everyone know about washing their brushes, or would that be helpful too? Let me know!

And hey, don’t forget about God’s makeup brushes: your fingers. Just keep those washed too, ok? Maybe more frequently than your actual brushes.

Standard